Watch the Lab Overview
For a quick intro into Maia, llick on the image below to watch a short video:

Introduction
In this quickstart, you'll sign up for Matillion's Data Productivity Cloud and prepare your environment for call center analytics with Maia. You'll create an account, choose your region and experience, and connect a Snowflake trial account so you can start building pipelines in minutes.
This hands-on lab demonstrates how to use Matillion Maia to transform call center data from raw audio transcripts using Snowflake Cortex AI functions. You'll learn to ingest, transcribe, enrich, and structure audio recordings (.mp3) directly in Snowflake. With functions like AI_TRANSCRIBE, SUMMARIZE, SENTIMENT, AI_SENTIMENT, COMPLETE, and EXTRACT_ANSWER, you'll unlock actionable insights from unstructured conversations and build advanced analytics pipelines.
- Convert call recordings into searchable transcripts.
- Summarize long conversations into concise overviews.
- Measure overall sentiment.
- Classify call types by intent (complaint, query, sales, cancellation, etc.).
- Extract key answers like agent name.
By the end of this lab, you will have transformed raw call recordings into actionable business intelligence, equipping analysts and support managers with the ability to identify trends, improve service quality, and uncover insights faster.
What You'll Learn
Maia
- Understand the capabilities of Matillion Maia for AI-powered data transformation.
- Learn how Maia integrates with Snowflake to process unstructured call center data.
- Explore Maia's features for orchestrating ETL workflows and leveraging AI functions.
- Discover how Maia simplifies building, scheduling, and monitoring data pipelines.
AI SQL
- Upload and manage unstructured call center data in Snowflake
- Transcribe audio with
AI_TRANSCRIBE - Extract structured details with
EXTRACT_ANSWER - Summarize transcripts with
SUMMARIZE - Analyze sentiment using
AI_SENTIMENT - Perform advanced prompt engineering with
AI_COMPLETE
Data Warehouse Design
You will learn how to build an end to end ETL pipeline that populates a traditional data warehouse design.

Download Source Files
Download all source SQL files for this lab here
Prerequisites
- A Snowflake account in a region where Snowflake Cortex LLM functions are supported
- Basic familiarity with SQL and the Snowflake UI
- Access all the scripts for this Lab on GitHub
- Download all the audio files
💡 Tip: Explore this interactive walkthrough to learn how to sign up for a Snowflake account.
💡 Tip: Use the LLM Function Availability page to check which cloud regions are supported.
Learning Outcome
Create the core Snowflake resources needed to run the AI Lab. This includes a database, warehouse, schemas, and a stage for uploading audio files.
Download Script
Download the source code for this step here.
Description
This setup script prepares your Snowflake environment to ingest and process unstructured call center data.
CREATE DATABASEensures your lab operates in a clean, isolated environment.CREATE WAREHOUSEprovisions compute resources for your queries and is configured to minimize cost via automatic suspend/resume.CREATE SCHEMAcreates logical namespaces for raw files (EXTRACT), processed/intermediate data (STAGE), and data warehouse objects (DWH).CREATE STAGEsets up a secure location to upload audio and transcript documents (.mp3,.json), supports directory-style access, and uses Snowflake‑managed encryption.
Step 1: Create the Database
This command creates a database named CALL_CENTER_ANALYTICS_DW if it doesn't already exist. Using IF NOT EXISTS ensures the script is idempotent and safe to rerun.
CREATE DATABASE IF NOT EXISTS CALL_CENTER_ANALYTICS_DW;
Step 2: Create Compute Warehouses
This step provisions two warehouses: USER_STD_XSMALL_WH for end users and APP_STD_XSMALL_WH for the Matillion service account. Separating workloads ensures there is no resource contention. Both warehouses are configured with cost-efficient settings:
- Size:
XSMALL— small and cost‑effective for light workloads. - Type:
STANDARD— supports most use cases. - Auto Suspend:
60seconds — saves credits after inactivity. - Auto Resume:
TRUE— resumes automatically on query. - Initially Suspended:
TRUE— starts paused until needed.
CREATE OR REPLACE WAREHOUSE USER_STD_XSMALL_WH
WITH
    WAREHOUSE_SIZE = 'XSMALL'
    WAREHOUSE_TYPE = 'STANDARD'
    AUTO_SUSPEND = 60
    AUTO_RESUME = TRUE
    INITIALLY_SUSPENDED = TRUE;

CREATE OR REPLACE WAREHOUSE APP_STD_XSMALL_WH
WITH
    WAREHOUSE_SIZE = 'XSMALL'
    WAREHOUSE_TYPE = 'STANDARD'
    AUTO_SUSPEND = 60
    AUTO_RESUME = TRUE
    INITIALLY_SUSPENDED = TRUE;
💡 Tip: Auto-suspend after 60 seconds prevents unnecessary credit usage. Auto-resume ensures queries always run when needed.
Step 3: Create Required Schemas
Schemas help organize your database objects.
CREATE SCHEMA IF NOT EXISTS CALL_CENTER_ANALYTICS_DW.EXTRACT;
CREATE SCHEMA IF NOT EXISTS CALL_CENTER_ANALYTICS_DW.STAGE;
CREATE SCHEMA IF NOT EXISTS CALL_CENTER_ANALYTICS_DW.DWH;
EXTRACTstores the ingested audio and transcript files.STAGEis used for parsed, structured, or AI-enriched data.DWHis reserved for data warehouse objects, semantic views, aggregated results, and reporting tables.
Using IF NOT EXISTS prevents duplication errors and makes the script safe to rerun.
Step 4: Create an Internal Stage for Uploads
The internal stage is where you will upload audio files. Also, create a file format for JSON to enable parsing of JSON documents.
CREATE OR REPLACE STAGE CALL_CENTER_ANALYTICS_DW.CALL_CENTER_ANALYTICS_DW.RAW.INT_STAGE_DOC
    DIRECTORY = ( ENABLE = true )
    ENCRYPTION = ( TYPE = 'SNOWFLAKE_SSE' );

CREATE OR REPLACE FILE FORMAT CALL_CENTER_ANALYTICS_DW.EXTRACT.JSON_FORMAT
  TYPE = JSON
  STRIP_OUTER_ARRAY = TRUE;
🔒 Note: Files uploaded here are secured with Snowflake's Server-Side Encryption (SSE).
CREATE ROLE IF NOT EXISTS APP_MATILLION_ROLE;

-- Assign application role to SYSADMIN (best practice)
GRANT ROLE APP_MATILLION_ROLE TO ROLE SYSADMIN;

-- Create user
CREATE USER IF NOT EXISTS APP_MATILLION_SVC
  TYPE = LEGACY_SERVICE                           -- Explicitly mark as service account
  PASSWORD = 'M@tillion!1.'
  DEFAULT_ROLE = APP_MATILLION_ROLE
  DEFAULT_WAREHOUSE = APP_STD_XSMALL_WH
  MUST_CHANGE_PASSWORD = FALSE             -- Not required for service users
  COMMENT = 'Service account for Matillion ETL operations';

-- Assign role to user
GRANT ROLE APP_MATILLION_ROLE TO USER APP_MATILLION_SVC;

-- Database & schema usage
GRANT USAGE ON DATABASE CALL_CENTER_ANALYTICS_DW TO ROLE APP_MATILLION_ROLE;
GRANT USAGE ON ALL SCHEMAS IN DATABASE CALL_CENTER_ANALYTICS_DW TO ROLE APP_MATILLION_ROLE;

-- Warehouse usage
GRANT OPERATE ON WAREHOUSE APP_STD_XSMALL_WH TO ROLE APP_MATILLION_ROLE;
GRANT USAGE ON WAREHOUSE APP_STD_XSMALL_WH TO ROLE APP_MATILLION_ROLE;

-- Stage usage
GRANT READ ON STAGE CALL_CENTER_ANALYTICS_DW.RAW.INT_STAGE_DOC_RAW TO ROLE APP_MATILLION_ROLE;
GRANT WRITE ON STAGE CALL_CENTER_ANALYTICS_DW.RAW.INT_STAGE_DOC_RAW TO ROLE APP_MATILLION_ROLE;

-- Table privileges (all current + future tables)
GRANT SELECT, INSERT, UPDATE, DELETE ON ALL TABLES IN SCHEMA CALL_CENTER_ANALYTICS_DW.RAW TO ROLE APP_MATILLION_ROLE;
GRANT SELECT, INSERT, UPDATE, DELETE ON ALL TABLES IN SCHEMA CALL_CENTER_ANALYTICS_DW.STAGE TO ROLE APP_MATILLION_ROLE;
GRANT SELECT, INSERT, UPDATE, DELETE ON ALL TABLES IN SCHEMA CALL_CENTER_ANALYTICS_DW.ANALYTICS TO ROLE APP_MATILLION_ROLE;

GRANT SELECT, INSERT, UPDATE, DELETE ON FUTURE TABLES IN SCHEMA CALL_CENTER_ANALYTICS_DW.RAW TO ROLE APP_MATILLION_ROLE;
GRANT SELECT, INSERT, UPDATE, DELETE ON FUTURE TABLES IN SCHEMA CALL_CENTER_ANALYTICS_DW.STAGE TO ROLE APP_MATILLION_ROLE;
GRANT SELECT, INSERT, UPDATE, DELETE ON FUTURE TABLES IN SCHEMA CALL_CENTER_ANALYTICS_DW.ANALYTICS TO ROLE APP_MATILLION_ROLE;
Step 6: Upload Files to the Stage
Your internal stage CALL_CENTER_ANALYTICS_DW.RAW.INT_STAGE_DOC_RAW is now set up.
- In Snowsight, go to Databases.
- Select
CALL_CENTER_ANALYTICS_DW→EXTRACT→ Stages. - Click on
INT_STAGE_DOC. - Click + Files and upload one or more audio recordings (.mp3), there are 50 files in total.
- Click + Files and upload the LOOKUP.json file (.json).
🔒 Note: The zip file that you downloaded will need to be unzipped. You need to upload the individual files.
Learning Outcomes
In this section, you will learn how to sign up for Matillion's Data Productivity Cloud and connect Matillion to your Snowflake warehouse. You will also set up the necessary defaults for seamless data integration.
Prerequisites
Before you begin, ensure you have:
- Access to a Snowflake account with privileges to create databases, warehouses, schemas, and stages.
Description
In this section, you'll create a Matillion account and configure your environment to work with call center data. You'll learn how to register, set up your profile, select your region, choose your experience, and connect to your Snowflake warehouse.
The trial is free and includes 500 usage credits, allowing you to explore Matillion's features for building and managing ETL pipelines.
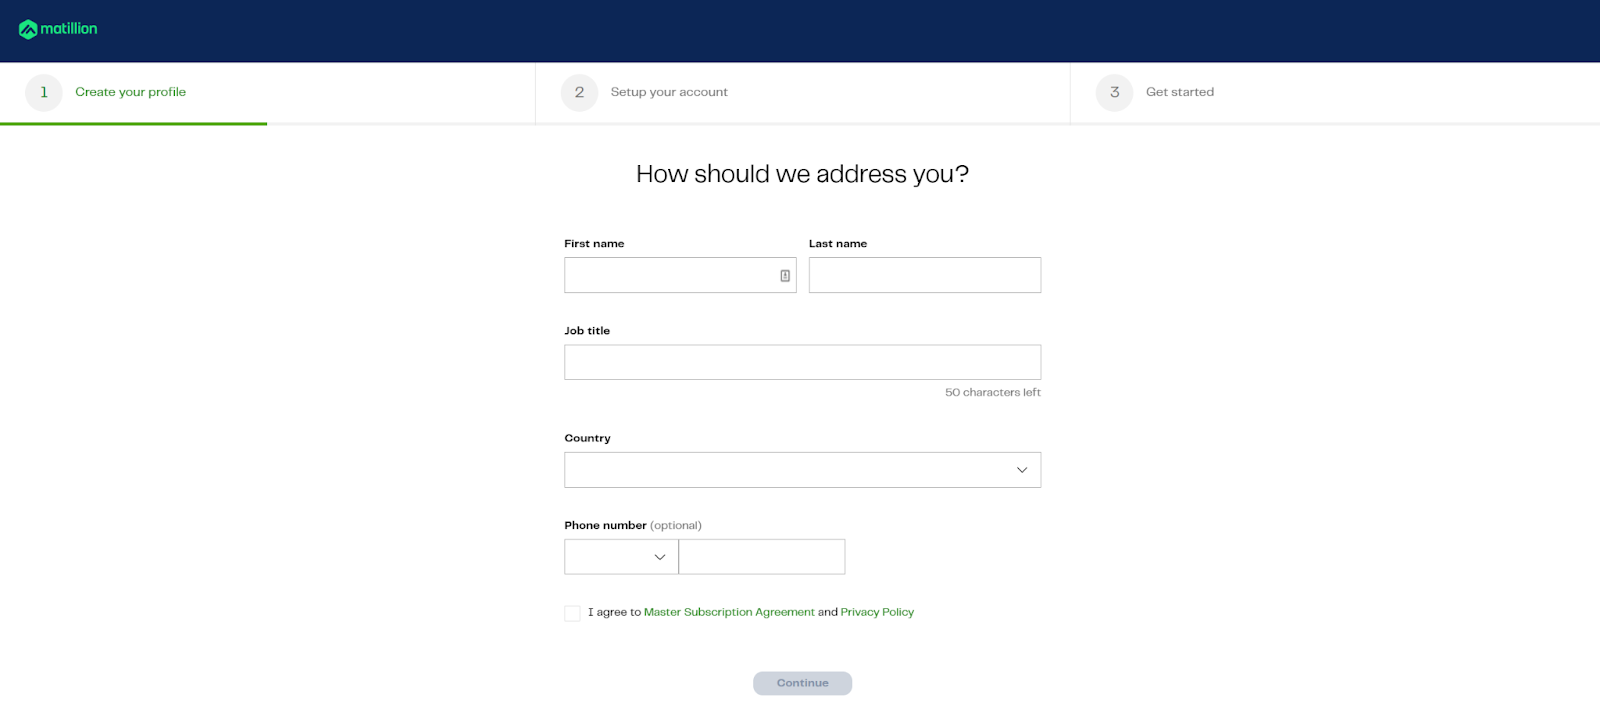
Step 1: Create your account
- Go to hub.matillion.com/register
- Choose a password and verify your email address
- Enter basic details like name, job title, and contact information
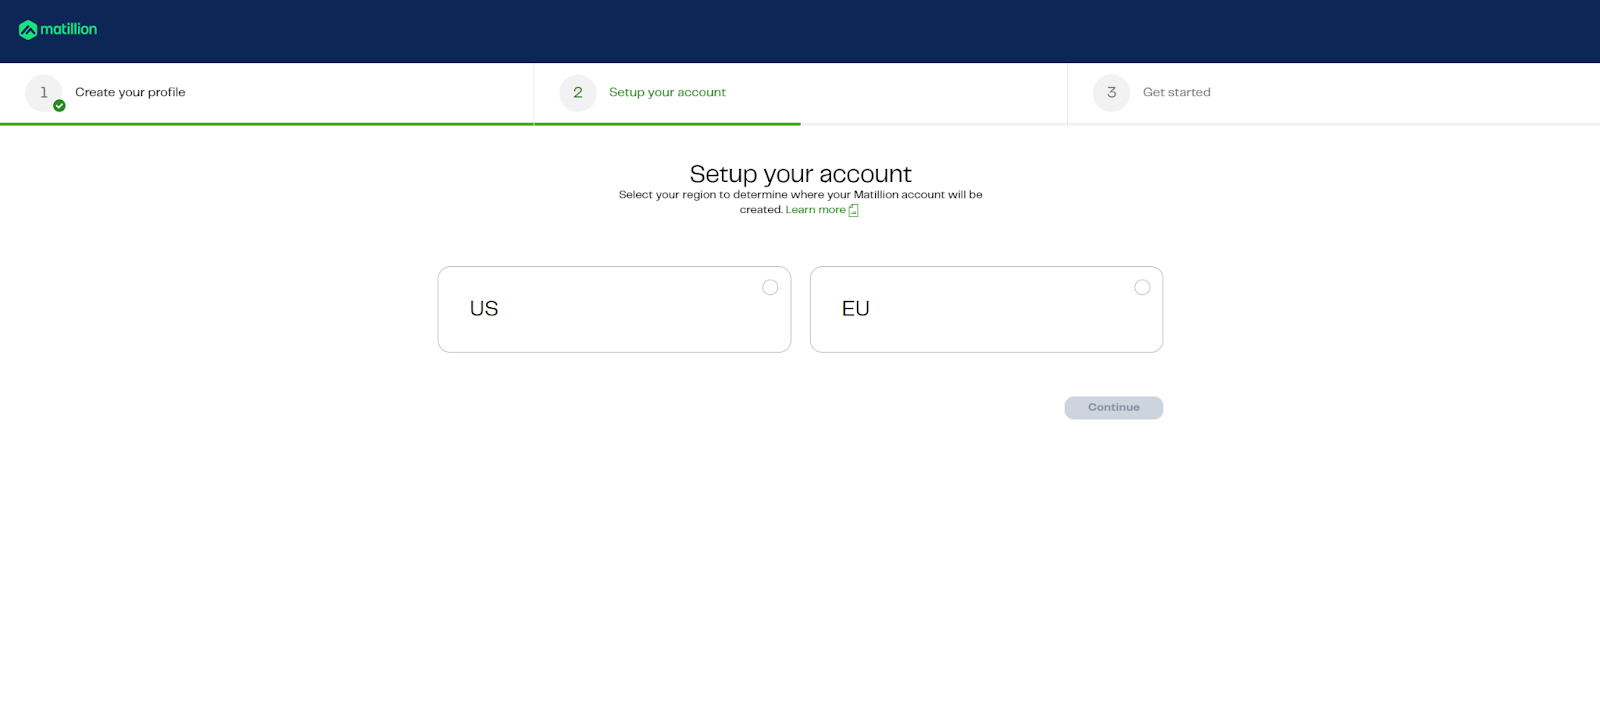
Step 2: Choose Region
Select your preferred region carefully—this cannot be changed later.
💡 Tip: If your Snowflake account is in AWS Oregon, choose "US" as your region, the option on the left.
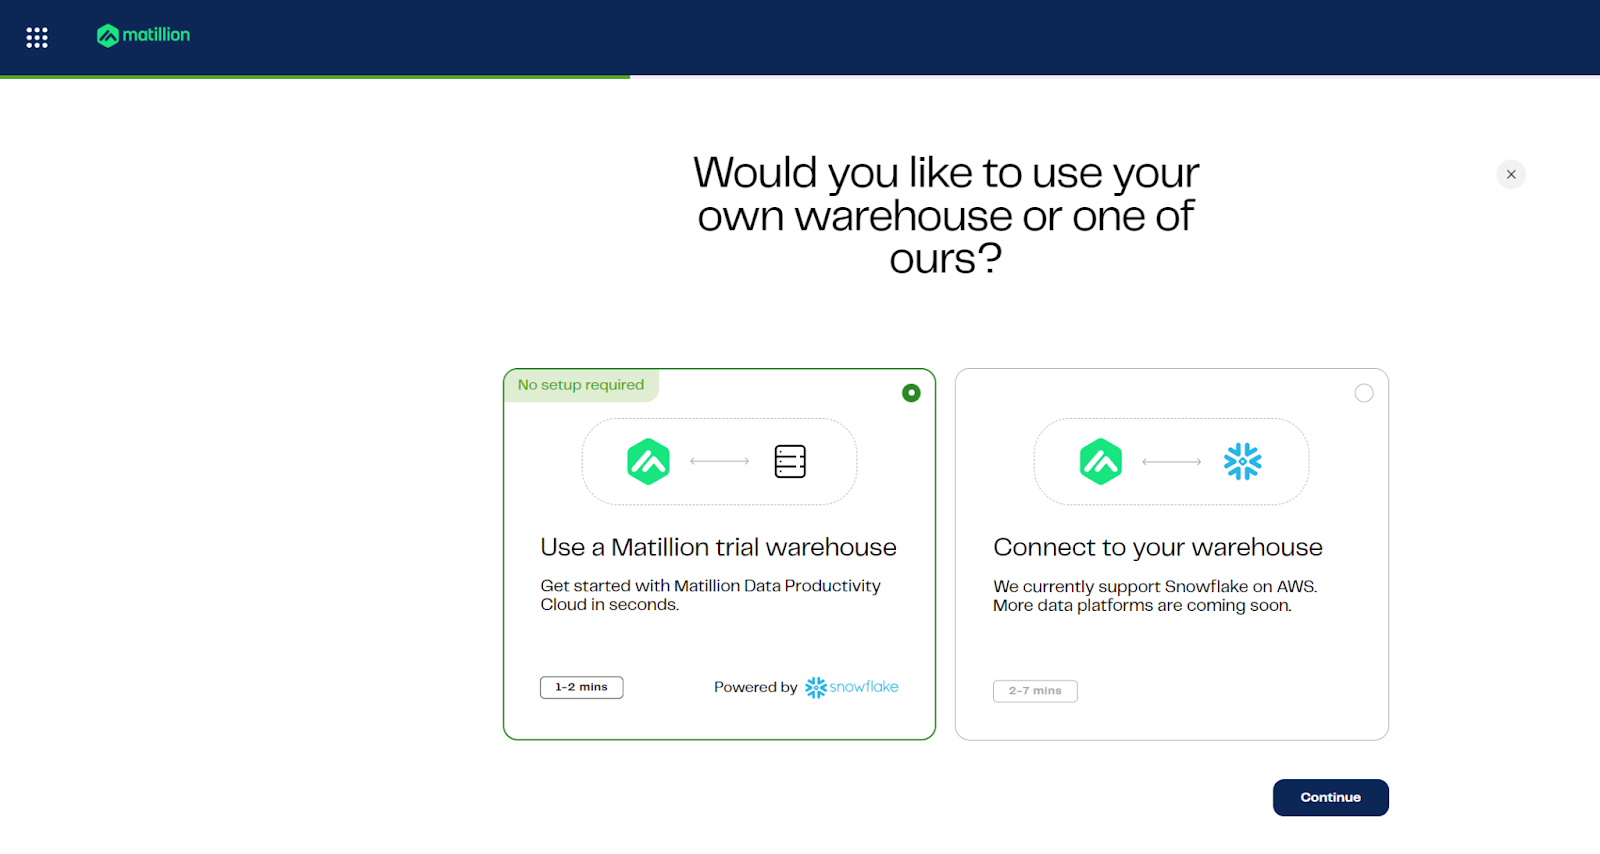
Step 3: Choose your experience
Choose "Connect to your warehouse", the option on the right.
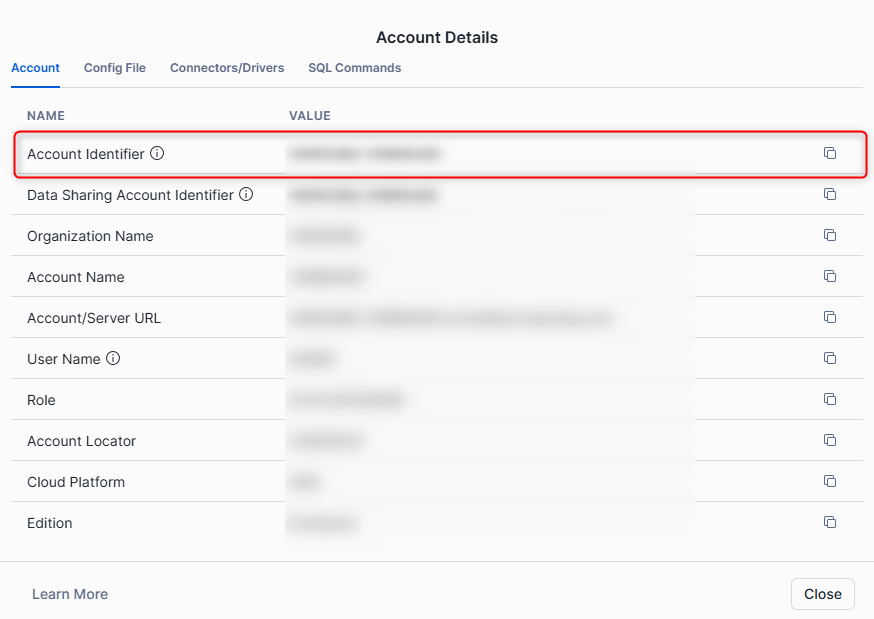
Step 4: Find Your Snowflake Account Identifier
To locate your account identifier in Snowflake:
- Open Snowsight.
- In the bottom left corner, click your username.
- Select "Connect a tool to Snowflake".
- Copy the Account Identifier shown—this is needed to connect Matillion to your Snowflake environment.
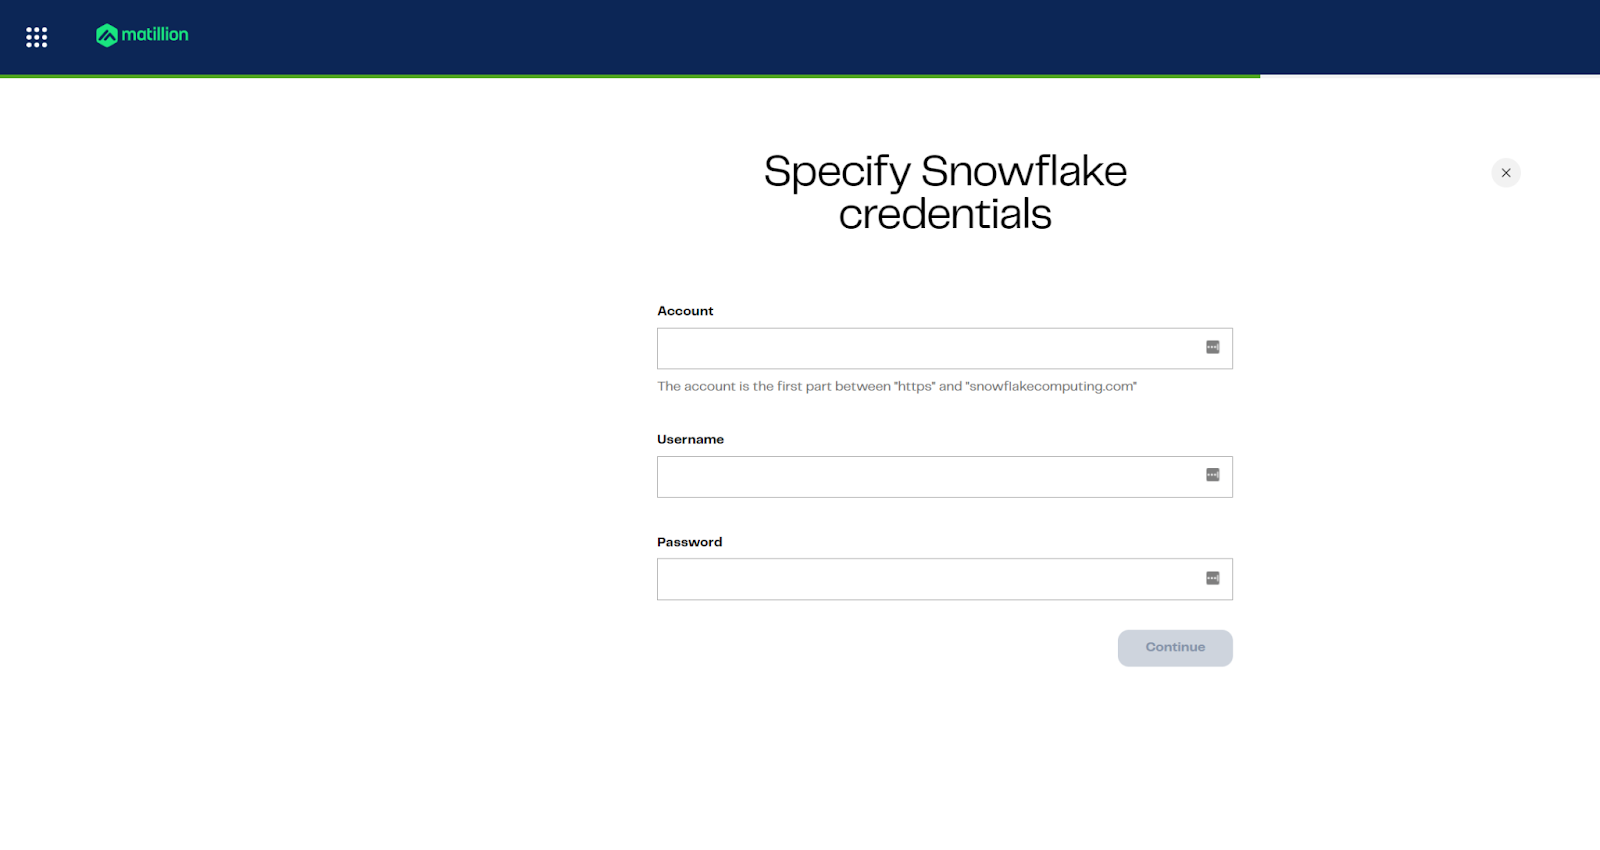
Step 5: Specify credentials
Provide account, username, and password for your warehouse
Use the following values (unless you changed the password)
Attribute | Value |
Account | XXXXXX-XXXXXXX |
Username | APP_MATILLION_SVC |
Password | M@tillion!1. |
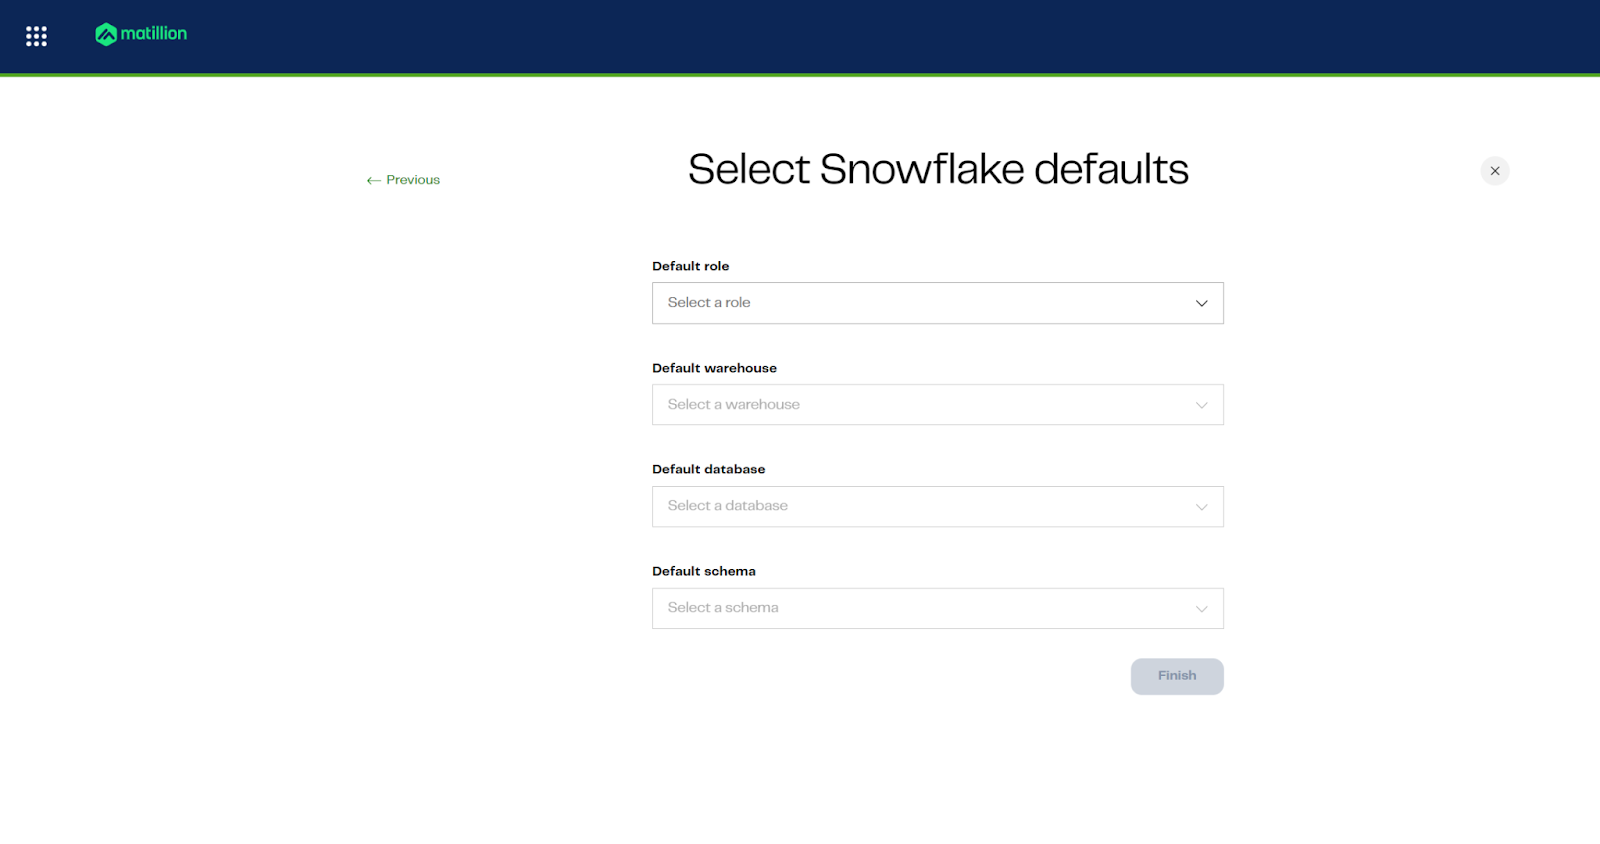
Step 6: Specify database defaults
Set role, warehouse, database, and schema defaults for pipelines
Attribute | Value |
Default role | APP_MATILLION_ROLE |
Default warehouse | APP_STD_XSMALL_WH |
Default database | CALL_CENTER_ANALYTICS_DW |
Default schema | EXTRACT |
You're now ready to begin building pipelines with Matillion and Maia.
Learning Outcomes
- Understand how to navigate the development environment.
- Learn how to import project files and manage folders.
- Validate and deploy a data warehouse schema using provided SQL scripts.
Prerequisites
- Access to the main development environment.
- Downloaded
CALL_CENTER_ANALYTICS_DW - START.zipfile. - Familiarity with basic file navigation.
- Lab images available in the
lab04folder.
Description
In this lab, you will clean up the workspace, import the required project files, and deploy a data warehouse schema using SQL scripts. You will also validate the deployment to ensure all objects are created successfully.
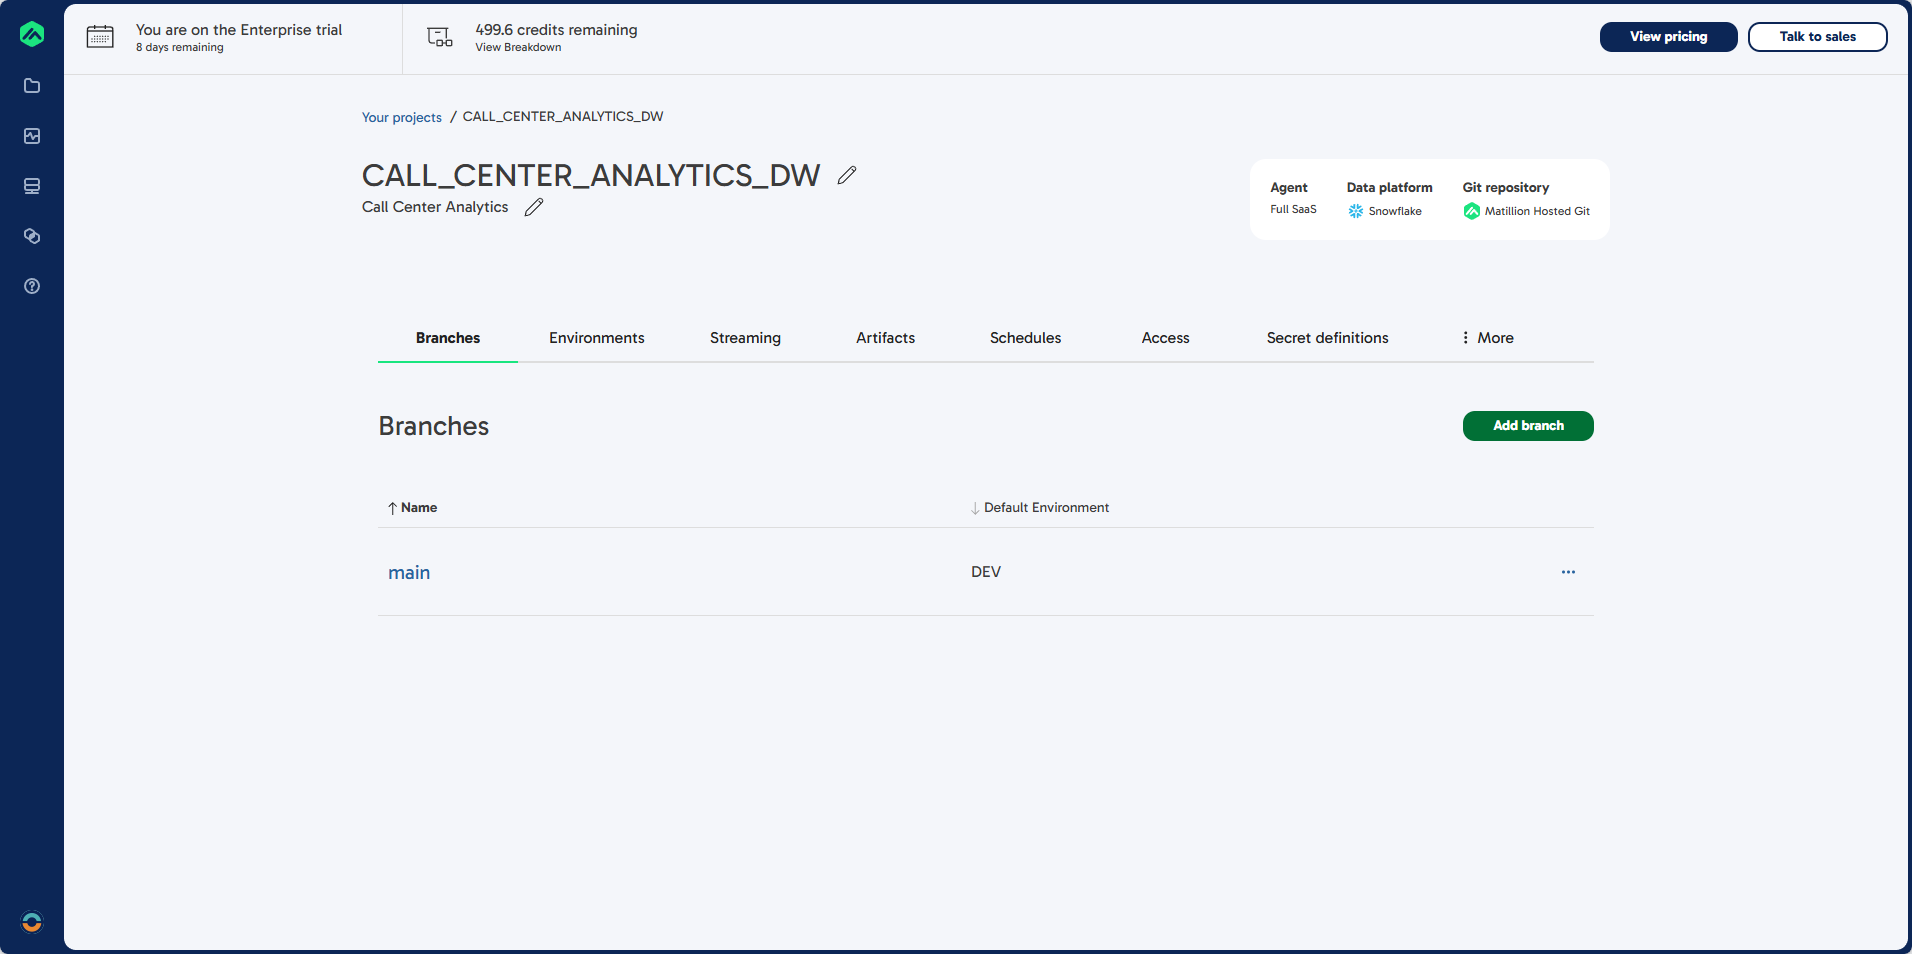
Steps 1: Enter the Main Development Environment
- Select main to enter the main development environment.
Steps 2: Clean Up Existing Folders
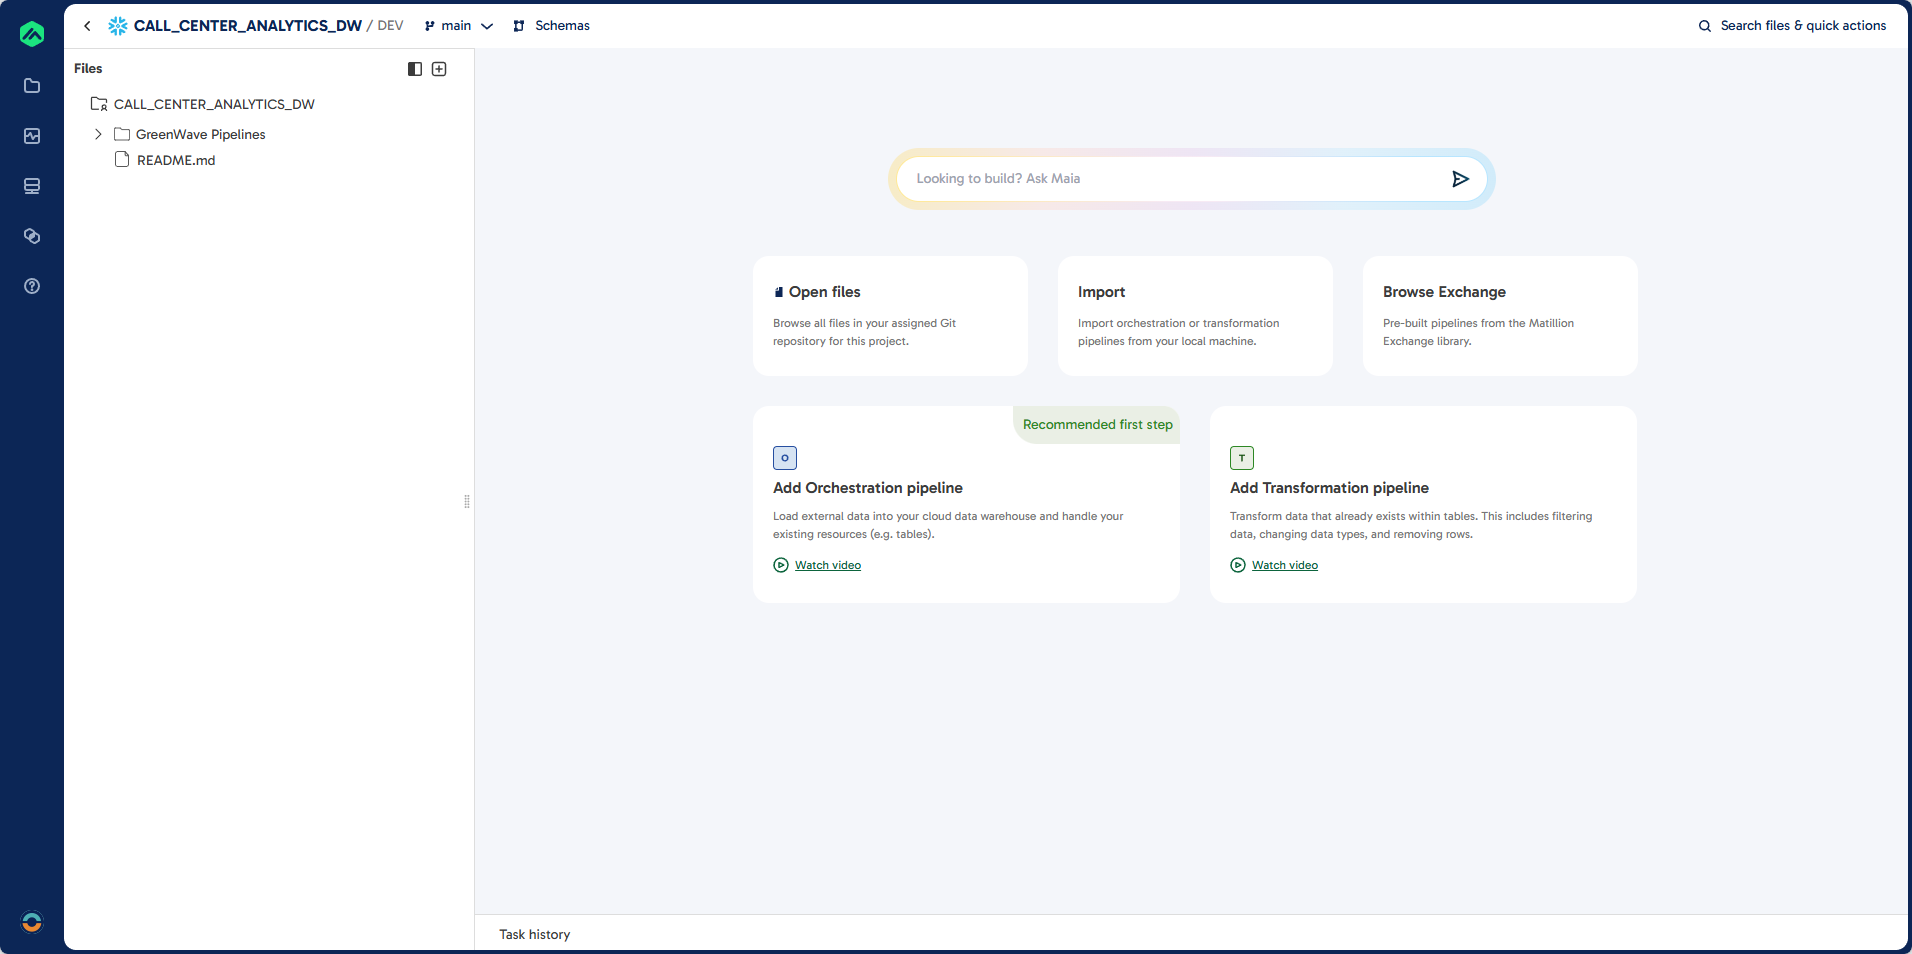
- You should see the File Browser on the left.
If not, select Open Files in the center of the screen. - Select the GreenWave Pipelines folder, click the
...menu, and choose Delete Folder. - Select the readme folder, click the
...menu, and choose Delete. - The file navigation should now disappear.
Steps 3: Import Project Files
- Click the plus (+) button in the top right corner of the file navigator and select Import.
- Choose the
CALL_CENTER_ANALYTICS_DW - START.zipfile you downloaded.
Steps 4: Explore Project Structure
- Expand all folders:
01 - EXTRACT02 - STAGE03 - LOAD04 - RESOURCES \ SQL \ DDL04 - RESOURCES \ SQL \ EXTRACT04 - RESOURCES \ SQL \ STAGE
- The
04 - RESOURCESfolder contains SQL scripts used byBUILD_SCHEMA_DWto create the data warehouse schema.
Steps 5: Deploy the Data Warehouse Schema
- Expand the
00 - DDLfolder. - Double-click the
BUILD_SCHEMA_DWjob to open it. - Review the tasks and dependencies. This job will drop any existing objects and deploy all tables for the EXTRACT, STAGE, and DWH schemas.
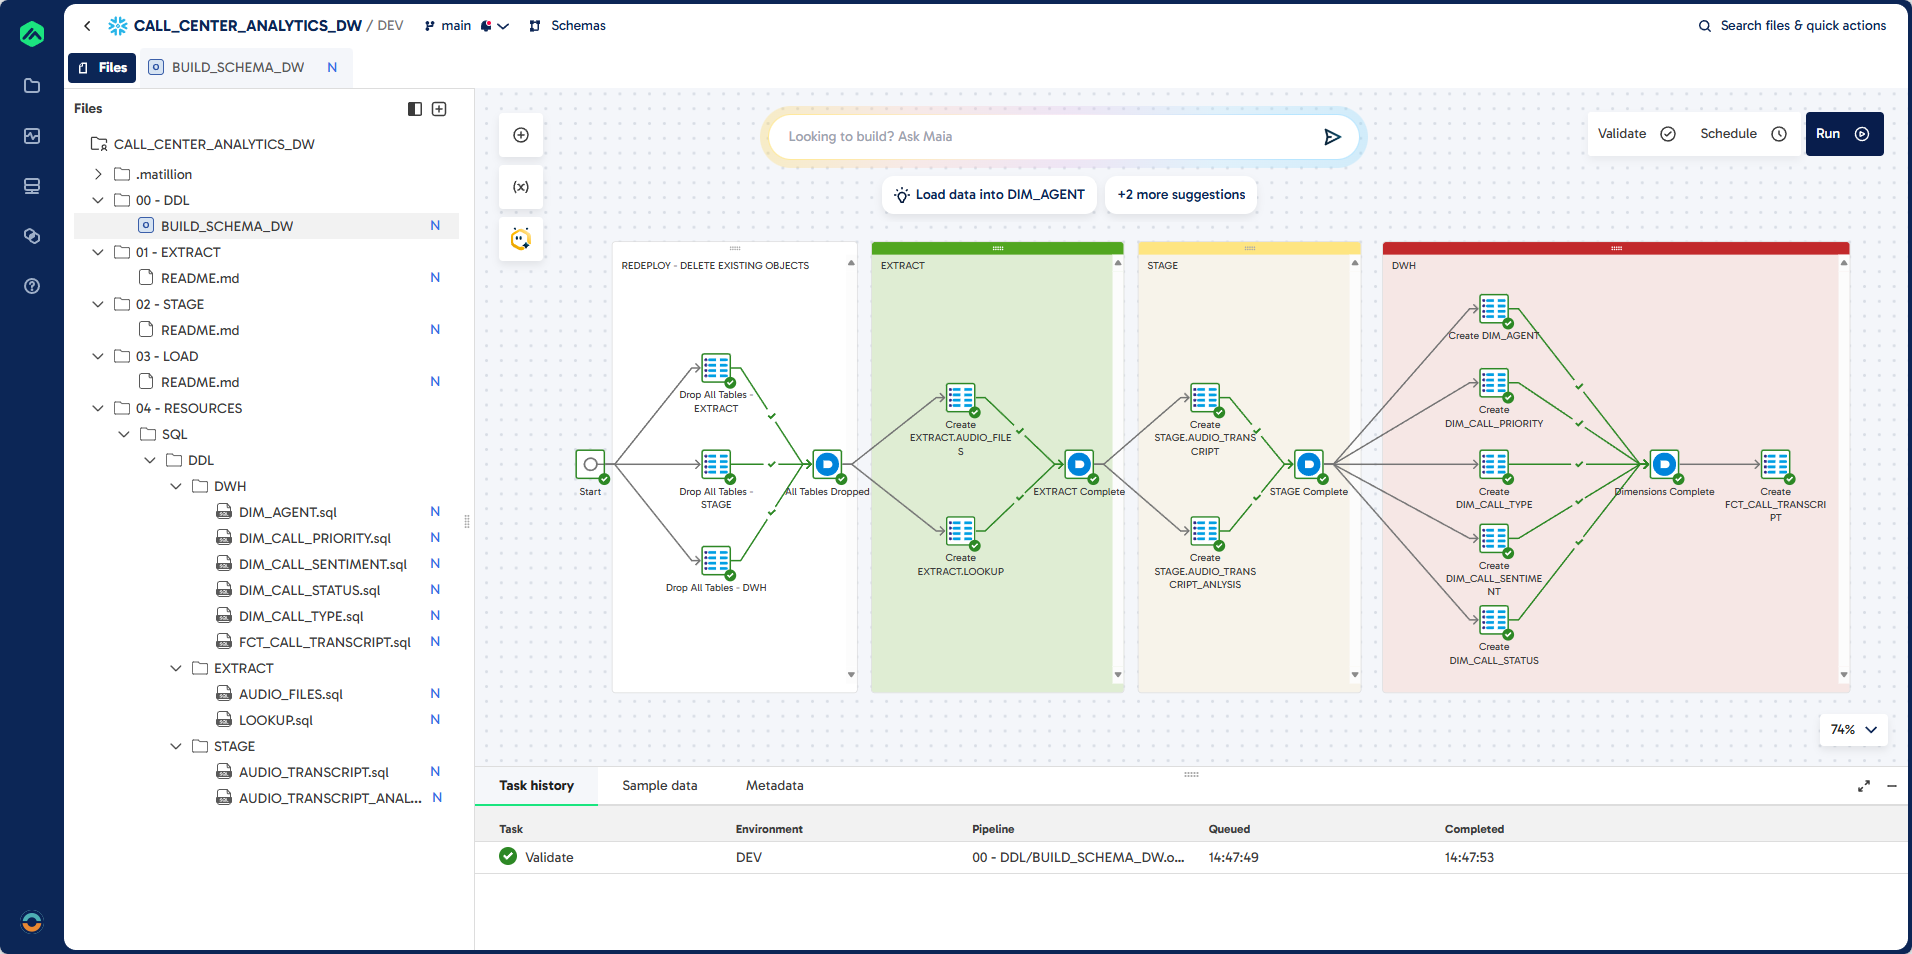
Steps 6: Validate and Run the Job
- Click Validate in the top right corner.
You should see green ticks added to each object. - Click Run in the top right corner.
- Review the Task History to confirm successful deployment.
Steps 7: Review in Snowflake
- Open Snowflake Browser
- In the left-hand menu, select Projects \ Workspaces.
- Click Add New and import the validation script.
- In the Data Explorer panel, expand the
CALL_CENTER_ANALYTICS_DWdatabase. - Expand each schema to review the available objects.
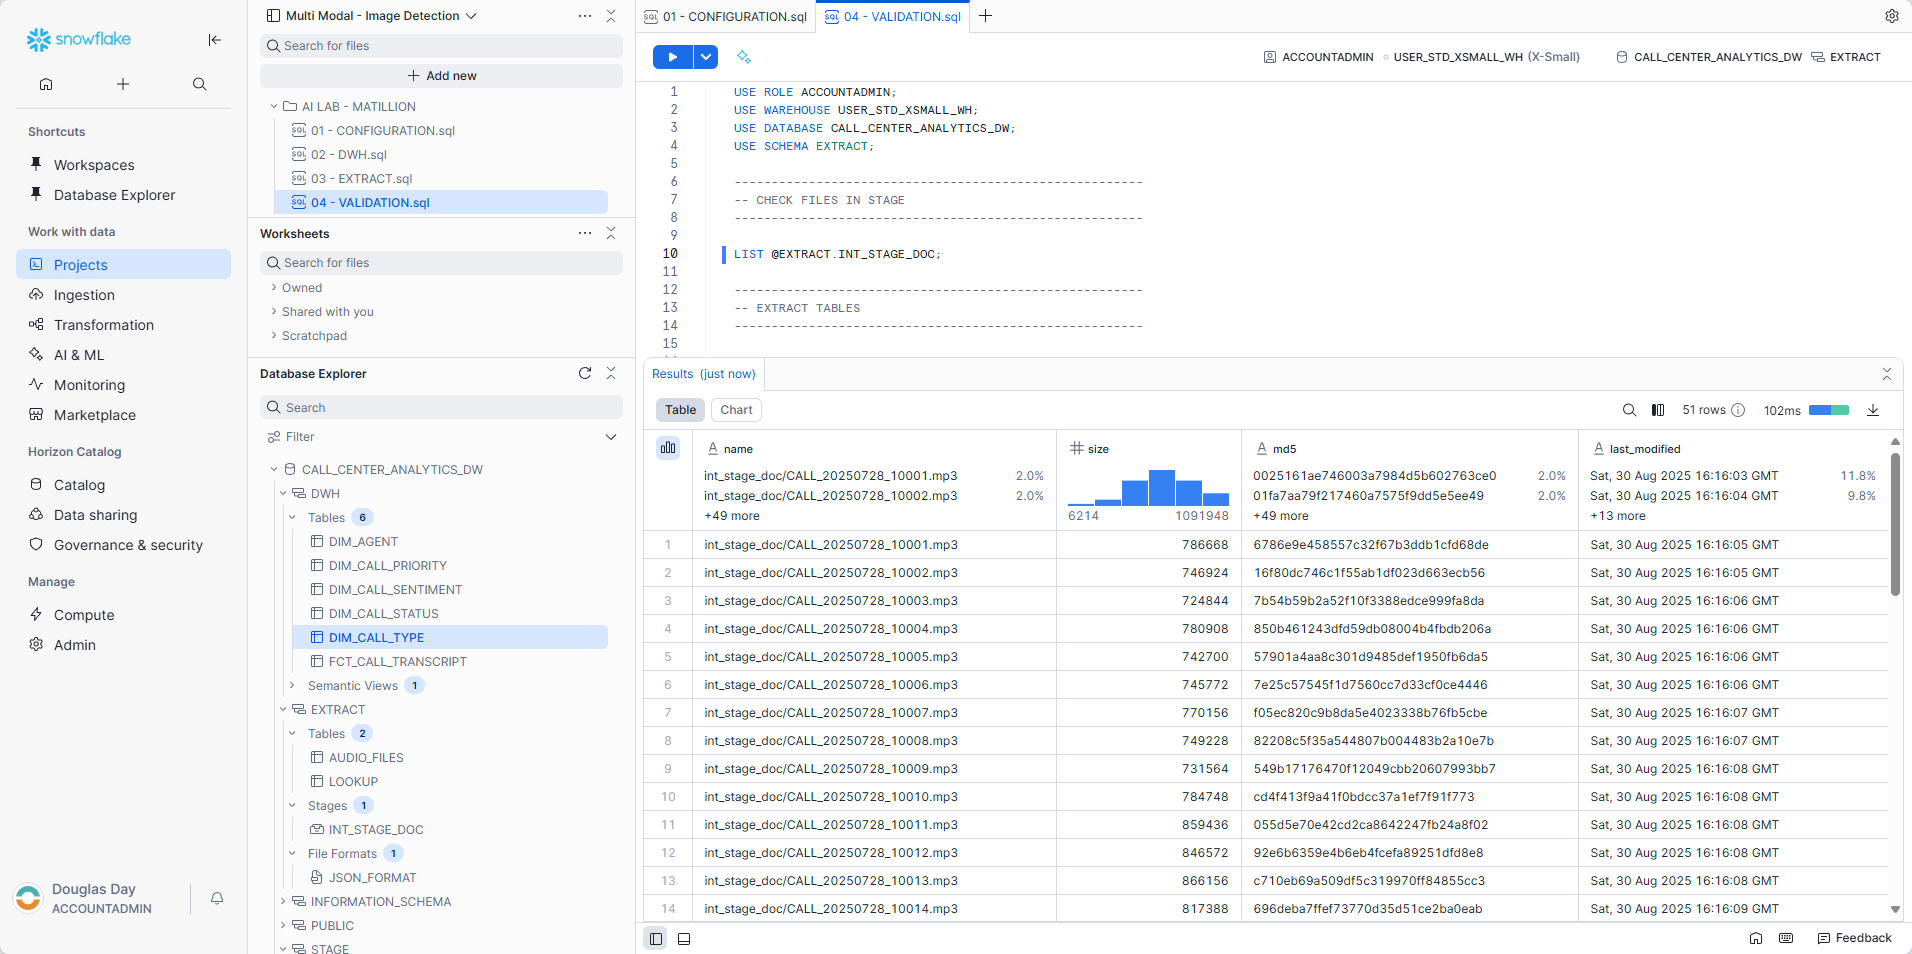
There are several queries that you can use in the validation script as we go through the lab to ensure that data is being loaded.
Set the context:
USE ROLE ACCOUNTADMIN;
USE WAREHOUSE USER_STD_XSMALL_WH;
USE DATABASE CALL_CENTER_ANALYTICS_DW;
USE SCHEMA EXTRACT;
Check to see that all the files have been uploaded:
LIST @EXTRACT.INT_STAGE_DOC;
Learning Outcomes
By completing this section, you will:
- Understand how to load and store binary data into snowflake table.
- Understand how to load and flatten JSON data.
- Prepare raw call center data for downstream AI enrichment and analytics.
Prerequisites
- Completion of Snowflake environment setup, including creation of stages and file formats.
- Access to Matillion Data Productivity Cloud with a connected Snowflake account.
- Audio files and lookup JSON uploaded to the Snowflake stage.
Description
In this section, you will create two Matillion Maia extract pipelines. The first pipeline loads new or updated audio files (.mp3) from a Snowflake stage into the EXTRACT.AUDIO_FILES table, ensuring incremental extraction and proper filtering. The second pipeline extracts lookup data from a JSON file, loading it into the EXTRACT.LOOKUP table for use in later transformation and enrichment steps. These pipelines form the foundation for processing and analyzing call center data.
Step 1: Create EXTRACT_AUDIO_TRANSCRIPT
Pipeline
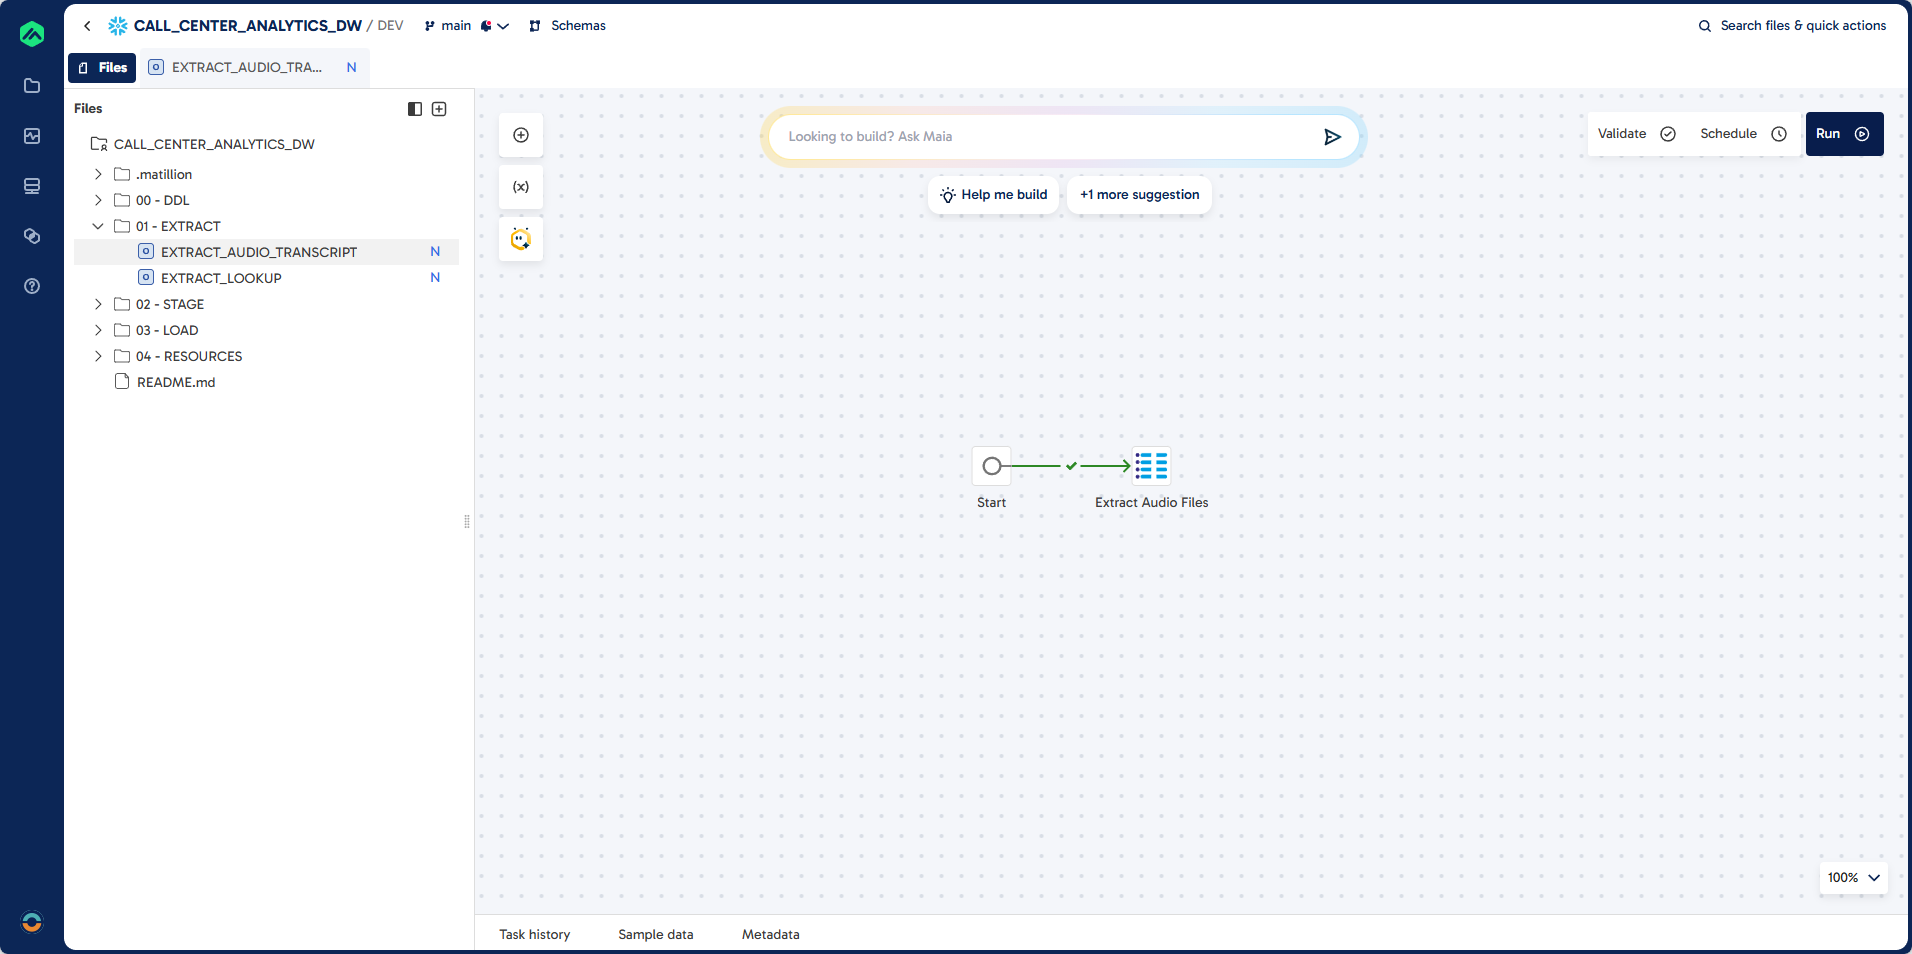
Prompt
Task: Create a pipeline to do incremental extract of audio files (.MP3) stored in a snowflake stage.

Job Name: EXTRACT_AUDIO_TRANSCRIPT
Folder: 01 - EXTRACT

Source: @EXTRACT.INT_STAGE_DOC
Target: EXTRACT.AUDIO_FILES (existing table)
Unique Identifier: CALL_TRANSCRIPT_ID
Load Type: Incremental - exclude existing records

Guidelines:
Filter: RELATIVE_PATH LIKE .mp3

Output Fields:
CALL_TRANSCRIPT_ID
FILE_PATH
AUDIO_FILE
AUDIO_FILE_URL
LAST_MODIFIED
FILE_SIZE
LAST_MODIFIED
FILE_EXTENSION
Step 2: Create EXTRACT_LOOKUP
Pipeline
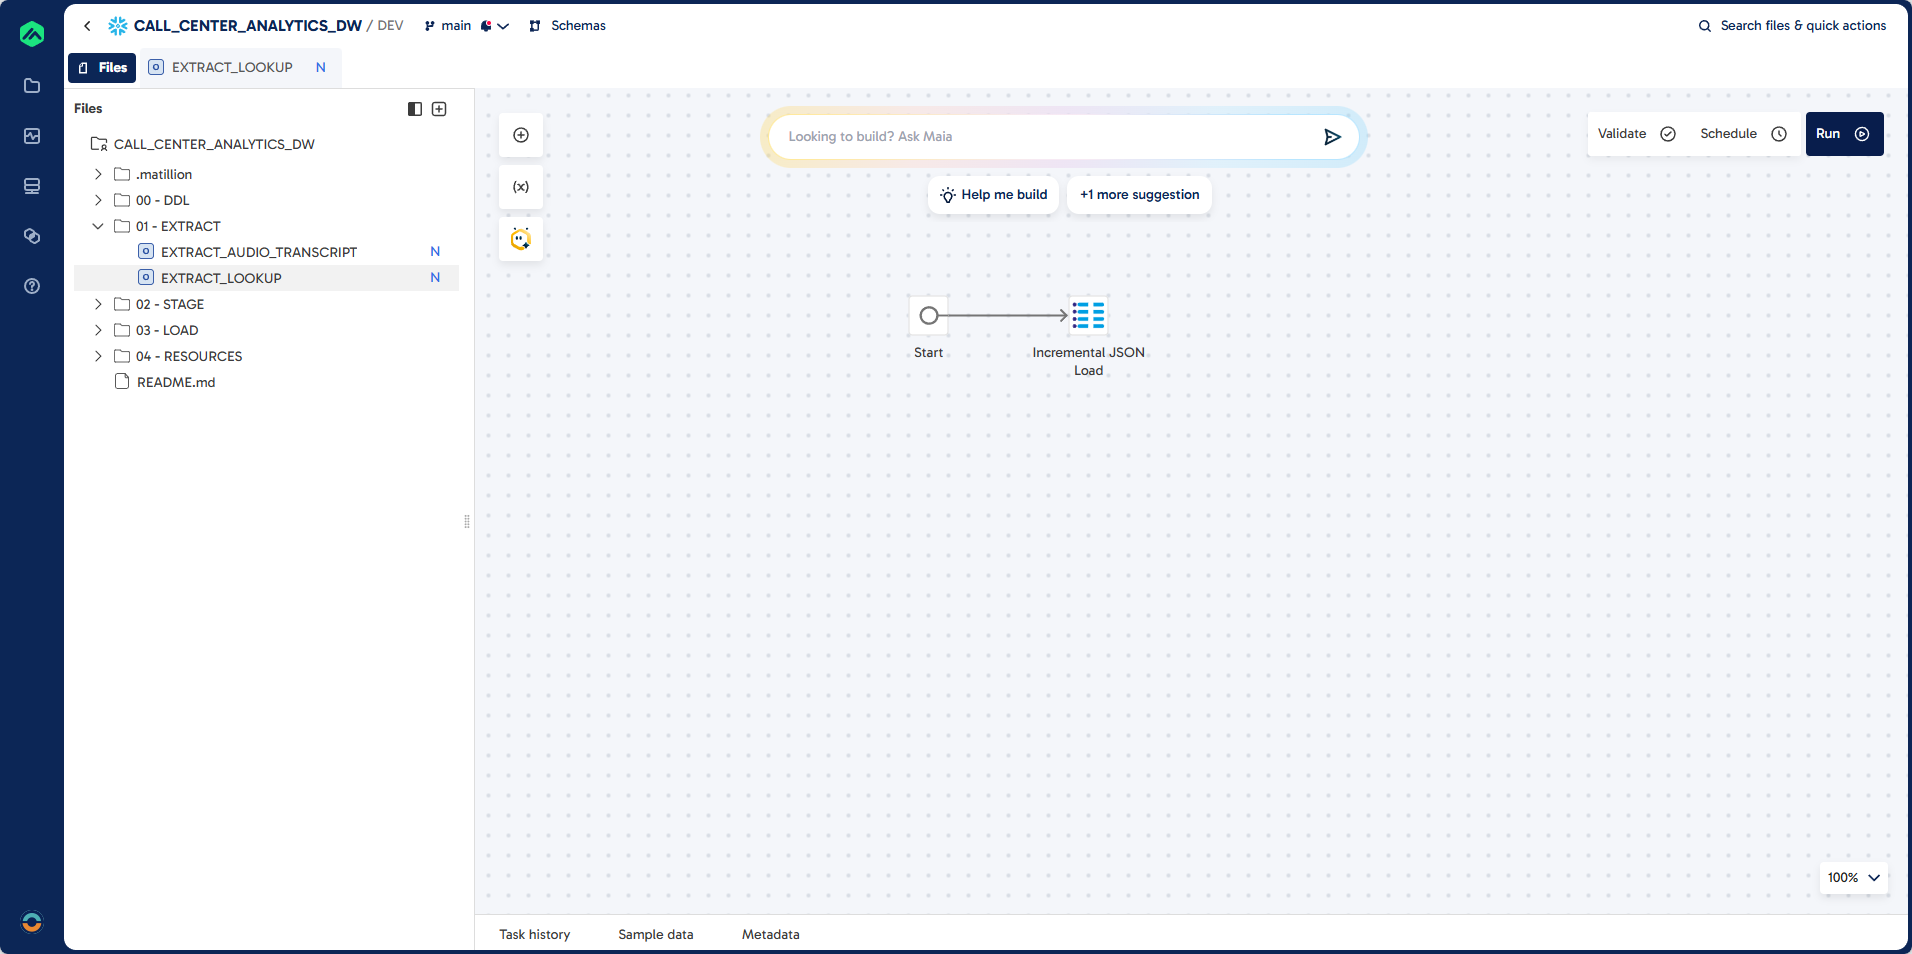
Prompt
Task: Create a pipeline to do incremental extract of json file stored in a snowflake stage.

Job Name: EXTRACT_LOOKUP
Folder: 01 - EXTRACT

Source: @EXTRACT.INT_STAGE_DOC
Target: EXTRACT.LOOKUP (existing table)
File: LOOKUP.json
File Format: EXTRACT.JSON_FORMAT
Unique Identifier: LOOKUP_FILTER, LOOKUP_ID
Load Type: Incremental - exclude existing records
Learning Outcomes
By completing this section, you will:
- Build a step-by-step transformation pipeline in Matillion Maia to analyze call center audio data using Snowflake Cortex AI functions.
- Use the following Snowflake Cortex AI functions in your pipeline:
AI_TRANSCRIBE: Convert raw audio files into searchable transcripts and extract metadata.EXTRACT_ANSWER: Extract the agent name from transcripts.SUMMARISE: Generate concise call summaries.AI_SENTIMENT: Classify overall call sentiment.COMPLETE: Extract multiple attributes such as call type, resolution status, priority, and sentiment score.
- Use the
REGEXfunction to derive agent initals from agent names. - Use CALCULATOR components to extract values from JSON AI responses.
- Implement incremental load logic to process only new or updated records, maintaining an efficient and up-to-date data warehouse.
- Understand how each AI function enriches your call center analytics for actionable business insights.
Prerequisites
- Completion of Snowflake configuration steps in this lab.
- Access to Matillion Data Productivity Cloud with a connected Snowflake account.
- Sufficient roles and privileges to create and manage schemas and projects.
- Extracted
.mp3audio files loaded into theEXTRACT.AUDIO_FILEStable.
Step 1: Create STAGE_AUDIO_TRANSCRIPT
In this step, you will build a Matillion Maia transformation pipeline to ingest and transcribe call center audio files. The pipeline reads .mp3 files from the source table, applies the Snowflake Cortex AI_TRANSCRIBE function to convert audio into text, and extracts key metadata such as duration, transcript content, and word/character counts. The job is designed for incremental loading, ensuring only new or updated audio files are processed and added to the target table. This forms the foundation for downstream analytics and enrichment.
Pipeline
Prompt
Task: Create a job to do incremental load of audio transcription:

Job Name: STAGE_AUDIO_TRANSCRIPT
Job Type: Transformation
Folder: 02 - STAGE

Source: EXTRACT.AUDIO_FILES
Target: STAGE.AUDIO_TRANSCRIPT (existing table)
Unique Identifier: TRANSCRIPT_ID (unique identifier)
Load Type: Incremental - exclude existing records

Guidelines: Use AI_TRANSCRIBE function to convert audio files to JSON extract the audio_duration and text attributes.

Required Output Fields:
TRANSCRIPT_ID
FILE_PATH
AUDIO_FILE_URL
FILE_SIZE
LAST_MODIFIED
TRANSCRIPT_JSON
DURATION
TRANSCRIPT
TRANSCRIPTION_DATE
CHARACTER_COUNT
WORD_COUNT
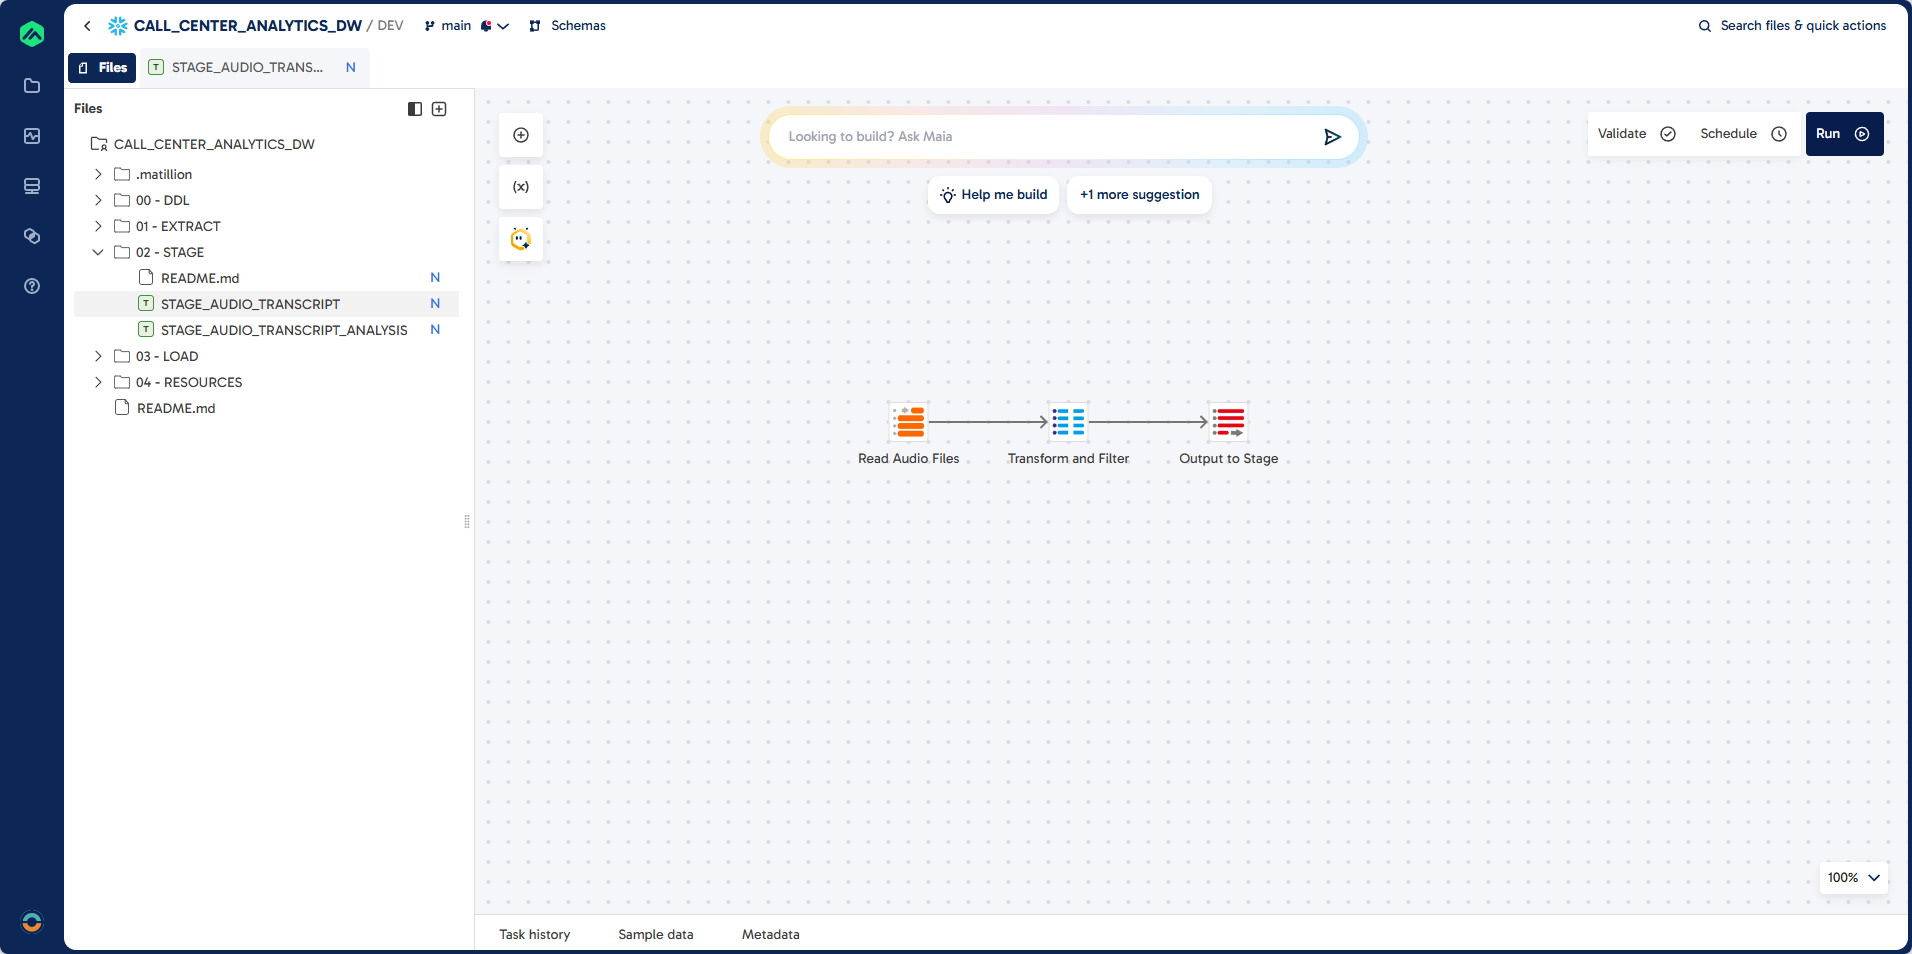
Step 2: Create STAGE_AUDIO_TRANSCRIPT_ANALYSIS
In this section, you will build a comprehensive transformation pipeline to analyze call center transcripts using Snowflake Cortex AI functions.
Pipeline
Prompt: Job
Each step below describes the transformation logic and the corresponding pipeline component.
First, you will create a blank transformation pipeline to serve as the foundation for subsequent steps.
Task: To create a complex data transformation pipeline step by step.
First create a blank transformation pipeline.

Job Name: STAGE_AUDIO_TRANSCRIPT_ANALYSIS
Folder: 02 - STAGE
Prompt: Table Input
Next, you will connect to the source table containing transcribed audio data. This step uses a Table Input component to read the necessary columns from the STAGE.AUDIO_TRANSCRIPT table.
Task: Create a connection to source table

Component: Table Input
Component Name: Input Audio Transcript

Source: STAGE.AUDIO_TRANSCRIPT
Columns:
CALL_TRANSCRIPT_ID
TRANSCRIPTION_DATE
AUDIO_FILE_URL
TRANSCRIPT
DURATION
CHARACTER_COUNT
WORD_COUNT
Prompt: Extract Answer
You will then extract the call center agent's name from each transcript using the Cortex Extract Answer component. This step applies an AI prompt to identify and return the agent's name.
Task: Extract the call centre agent name from the transcript.
Component: Cortex Extract Answer
Component Name: Extract Answer
Column: AGENT_NAME_AI
Question: What is the name of the caller centre agent?
Prompt: Summarise
After extracting the agent name, you will summarize the transcript using the Cortex Summarise component. This provides a concise overview of each call.
Task: Summarise the call centre transcript
Component: Cortex Summarise
Component Name: Summarise
Prompt: Sentiment
Next, you will classify the overall sentiment of the call using the Cortex Sentiment component. This step adds a sentiment score or label to each transcript.
Task: Add a sentiment classification
Component: Cortex Sentiment
Component Name: Sentiment
Prompt: Complete
You will then extract multiple key attributes from the transcript using the Cortex Multi-Prompt component. This step categorizes the call type, resolution status, priority, and calculates a sentiment score based on AI-driven prompts.
Task: Extract the following information from the call centre transcript.
Component: Cortex Multi-Prompt
Component Name: Complete

--------------------------------------------------
Column: CALL_TYPE_CODE
Prompt: Categorise the call into one of the following?

BILLING:Billing enquiry. Questions about charges, payments, or invoices.
TECHNICAL_SUPPORT: Technical support. Help resolving technical issues or access problems.
COMPLAINT: Complaint. Customer expresses dissatisfaction or reports a problem.
INFORMATION: Information request. Caller asks for information or clarification.
SALES: Sales/upgrade. Interest in buying or upgrading a product or service.
CANCELLATION: Cancellation. Caller wants to cancel a subscription or service.
OTHER: Other. Does not fit known categories; requires manual review or enrichment.

You must return ONE of the codes: BILLING, TECHNICAL_SUPPORT, COMPLAINT, INFORMATION, SALES, CANCELLATION, OTHER

--------------------------------------------------
Column: CALL_STATUS_CODE
Prompt: Has the call be resolved?

YES: Issue resolved. Problem fully addressed during the interaction.
PARTIAL: Partially resolved. Follow-ups or actions still required.
NO: Not resolved. Issue unresolved; escalation likely.

You must return ONE of the codes: YES, PARTIAL, NO

--------------------------------------------------
Column: CALL_PRIORITY_CODE
Prompt: What is the priority of this call?

LOW: Items that can be solved within 3 days.
MEDIUM: Target resolution within 24-72 hours.
HIGH: Requires action within 24 hours.
CRITICAL: Immediate action required; severe impact likely.

--------------------------------------------------
You must return ONE of the codes: LOW, MEDIUM, HIGH, CRITICAL

Column: CALL_SENTIMENT_SCORE
Prompt: Calculate a Call Sentiment Score between -1 and 1?
Prompt: Calculator
After extracting and transforming the necessary attributes from the transcripts, you will use a Calculator component to further process and standardize the data. This step ensures that key fields are properly formatted and derived for downstream analytics.
Component: Calculator
Component Name: Data Extraction

Task: Extract the answer from the AGENT_NAME_AI json and upper case.
Column: AGENT_NAME

Task: Extract the sentiment from the sentiment_TRANSCRIPT json and upper case.
Column: CALL_SENTIMENT_CODE

Task: What are the initials of the caller centre agent, combined using REGEX and upper case?
Column: AGENT_CODE
Prompt: Rename
Next, review the pipeline to confirm that all required columns are present and correctly named. Use the Rename component to standardize column names and prepare the data for loading into the target table.
Task: Review the pipeline and ensure you have all the columns.
Component: Rename
Component Name: Rename
Columns:
CALL_TRANSCRIPT_ID
CALL_SUMMARY
CALL_TRANSCRIPT
CALL_DATE
AGENT_CODE
AGENT_NAME
CALL_TYPE_CODE
CALL_SENTIMENT_CODE
CALL_PRIORITY_CODE
CALL_STATUS_CODE
CALL_DURATION
CALL_CHARACTER_COUNT
CALL_WORD_COUNT
CALL_SENTIMENT_SCORE

Task: Insert into STAGE.AUDIO_TRANSCRIPT_ANALYSIS.
Component: Table Output
Component Name: Insert Audio Transcript Analysis
Prompt: Filter
To prevent duplicate processing, add a filter to exclude records that have already been loaded. Insert a SQL component between the Input Audio Transcript and Extract Answer steps to implement this logic.
Task: Add Filter to exclude existing records that have already been loaded
Component: SQL
Component Name: Filter Existing Records
Guidelines: Add this between Input Audio Transcript and Extract Answer
Learning Outcomes
By completing this section, you will:
- Understand how to design and implement a star schema data warehouse for call center analytics.
- Build transformation pipelines to incrementally load dimension and fact tables using Matillion Maia.
- Apply best practices for data cleansing, deduplication, and surrogate key management.
- Integrate AI-enriched call transcript data with structured warehouse tables for advanced reporting.
Prerequisites
Completion of previous lab steps, including extraction and staging of call center audio and transcript data.
Description
In this section, you will construct a robust data warehouse to support call center analytics. You will create transformation pipelines to load dimension tables (agents, call priority, sentiment, status, and type) and a fact table for call transcripts. Each pipeline ensures incremental loading by filtering out existing records and standardizing data formats. You will also build a parent orchestration job to automate the full data warehouse refresh, enabling seamless integration of AI-driven insights with traditional reporting structures.
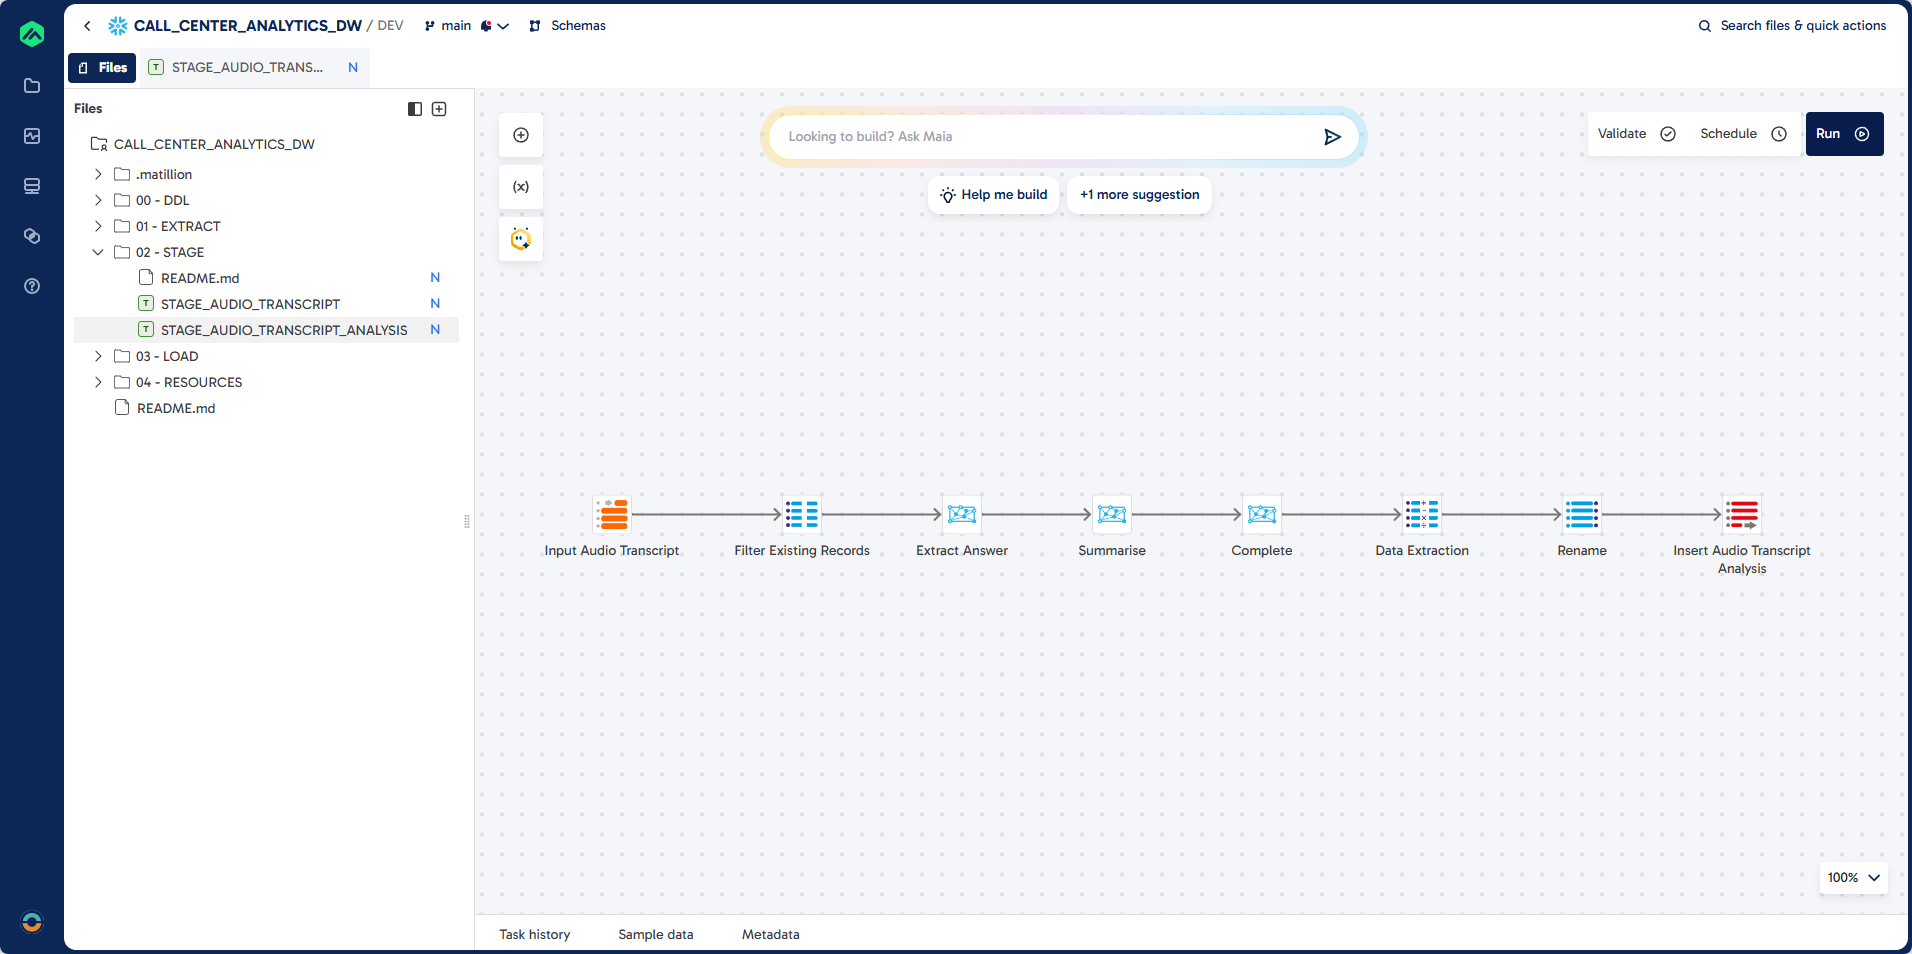
Step 1: Create LOAD_DIM_AGENT
In this step, you will build a transformation pipeline to load unique agent records into the DIM_AGENT dimension table. This process extracts distinct agent codes and names from the analyzed transcripts, ensures all data is upper case, and filters out records that already exist in the destination table for incremental loading.
Pipeline
Prompt
Task: Load unique agent records into DIM_AGENT
Job Name: LOAD_DIM_AGENT
Job Type: Transformation
Folder: 03 - LOAD

Source: STAGE.AUDIO_TRANSCRIPT_ANALYSIS
Target: DWH.DIM_AGENT (existing table)
Unique Identifier: AGENT_CODE
Load Type: Incremental Load
Component: Table Input, SQL, Calculator, Table Ouput

Guidelines:
Use distinct AGENCT_CODE and AGENT_NAME
Ensure all columns are upper case
Filter Existing Records
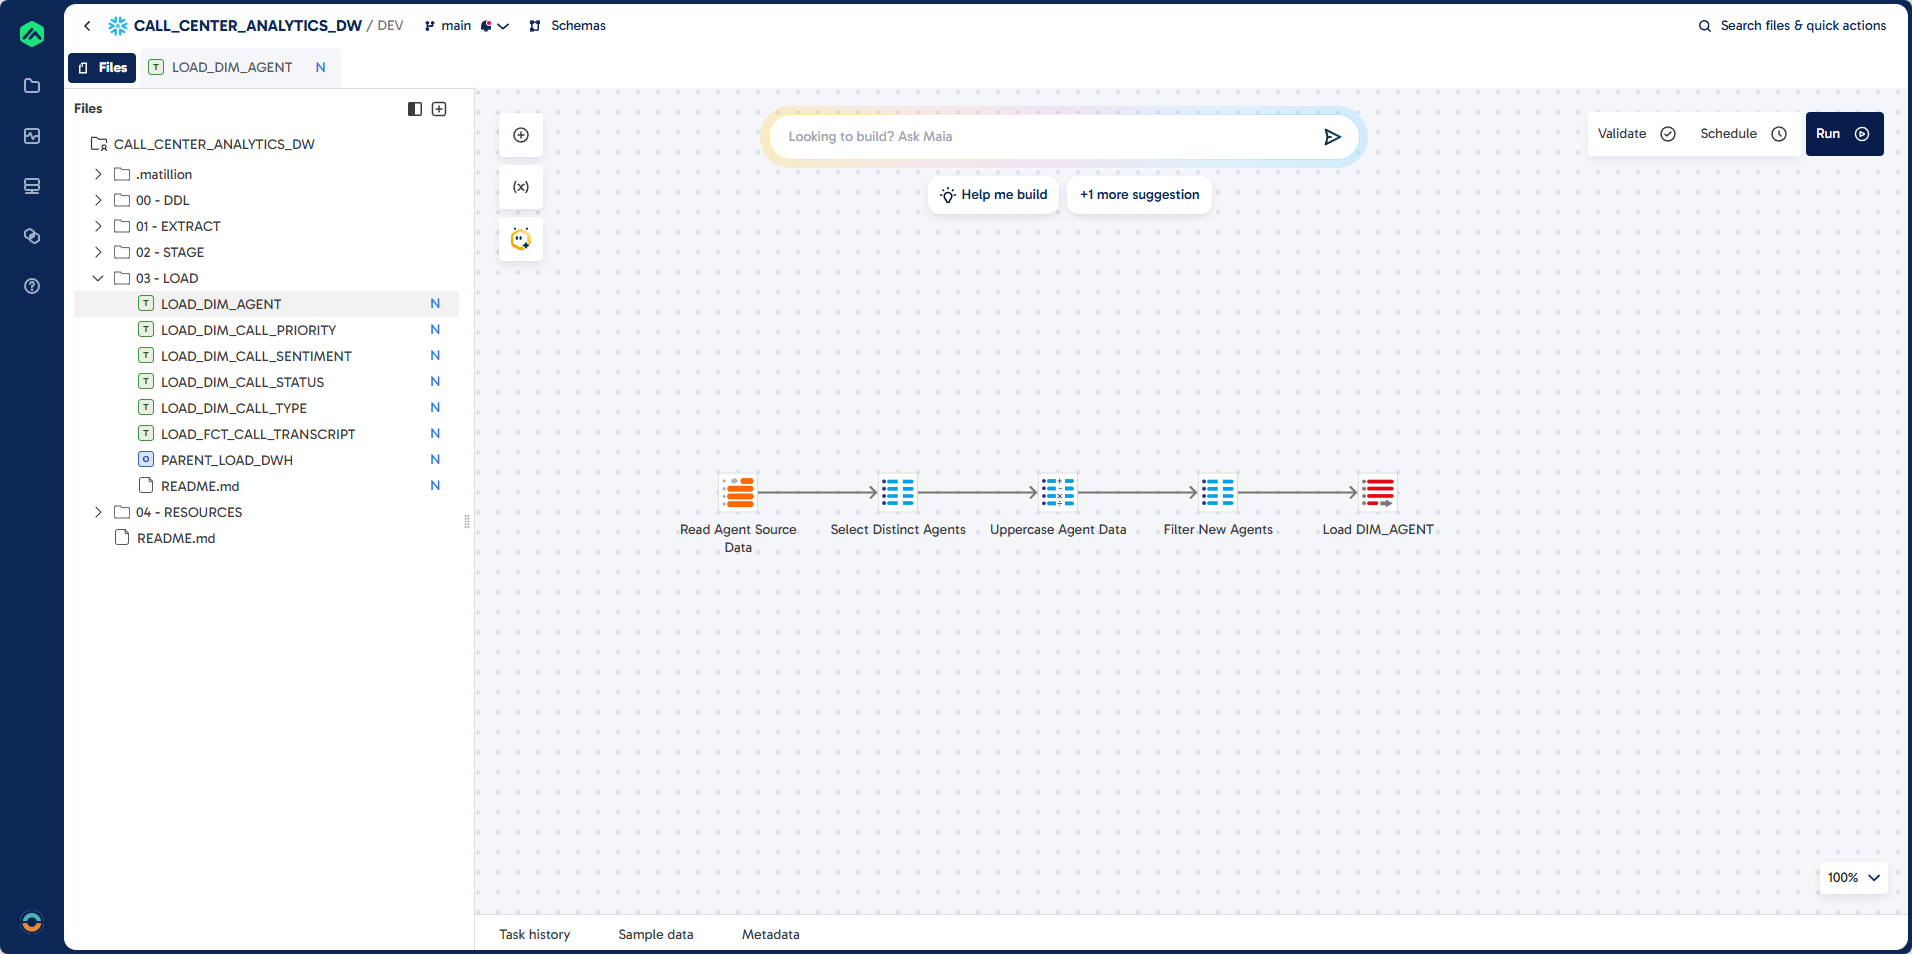
Step 2: Create LOAD_DIM_CALL_PRIORITY
This section guides you through building a pipeline to populate the DIM_CALL_PRIORITY dimension table. You will filter lookup records for call priority, transform columns to upper case, and insert only new records into the destination table.
Pipeline
Prompt
Task: Create Dimension Load for DIM_CALL_PRIORITY

Job Name: LOAD_DIM_CALL_PRIORITY
Job Type: Transformation
Folder: 03 - LOAD

Source: EXTRACT.LOOKUP
Filter: LOOKUP_FILTER = "CALL_PRIORITY"
Target: DWH.DIM_CALL_PRIORITY (existing table)
Unique Identifier: CALL_PRIORITY_CODE
Load Type: Incremental Load

Guidelines:
Component: Calculator
Ensure all columns are upper case

Component: SQL
Filter for records that do not exist in destination

Component: Table Ouput
Insert records into destination
Step 3: Create LOAD_DIM_CALL_SENTIMENT
Here, you will create a pipeline to load sentiment dimension data into DIM_CALL_SENTIMENT. The process filters for sentiment lookups, transforms columns to upper case, and loads only new records.
Pipeline
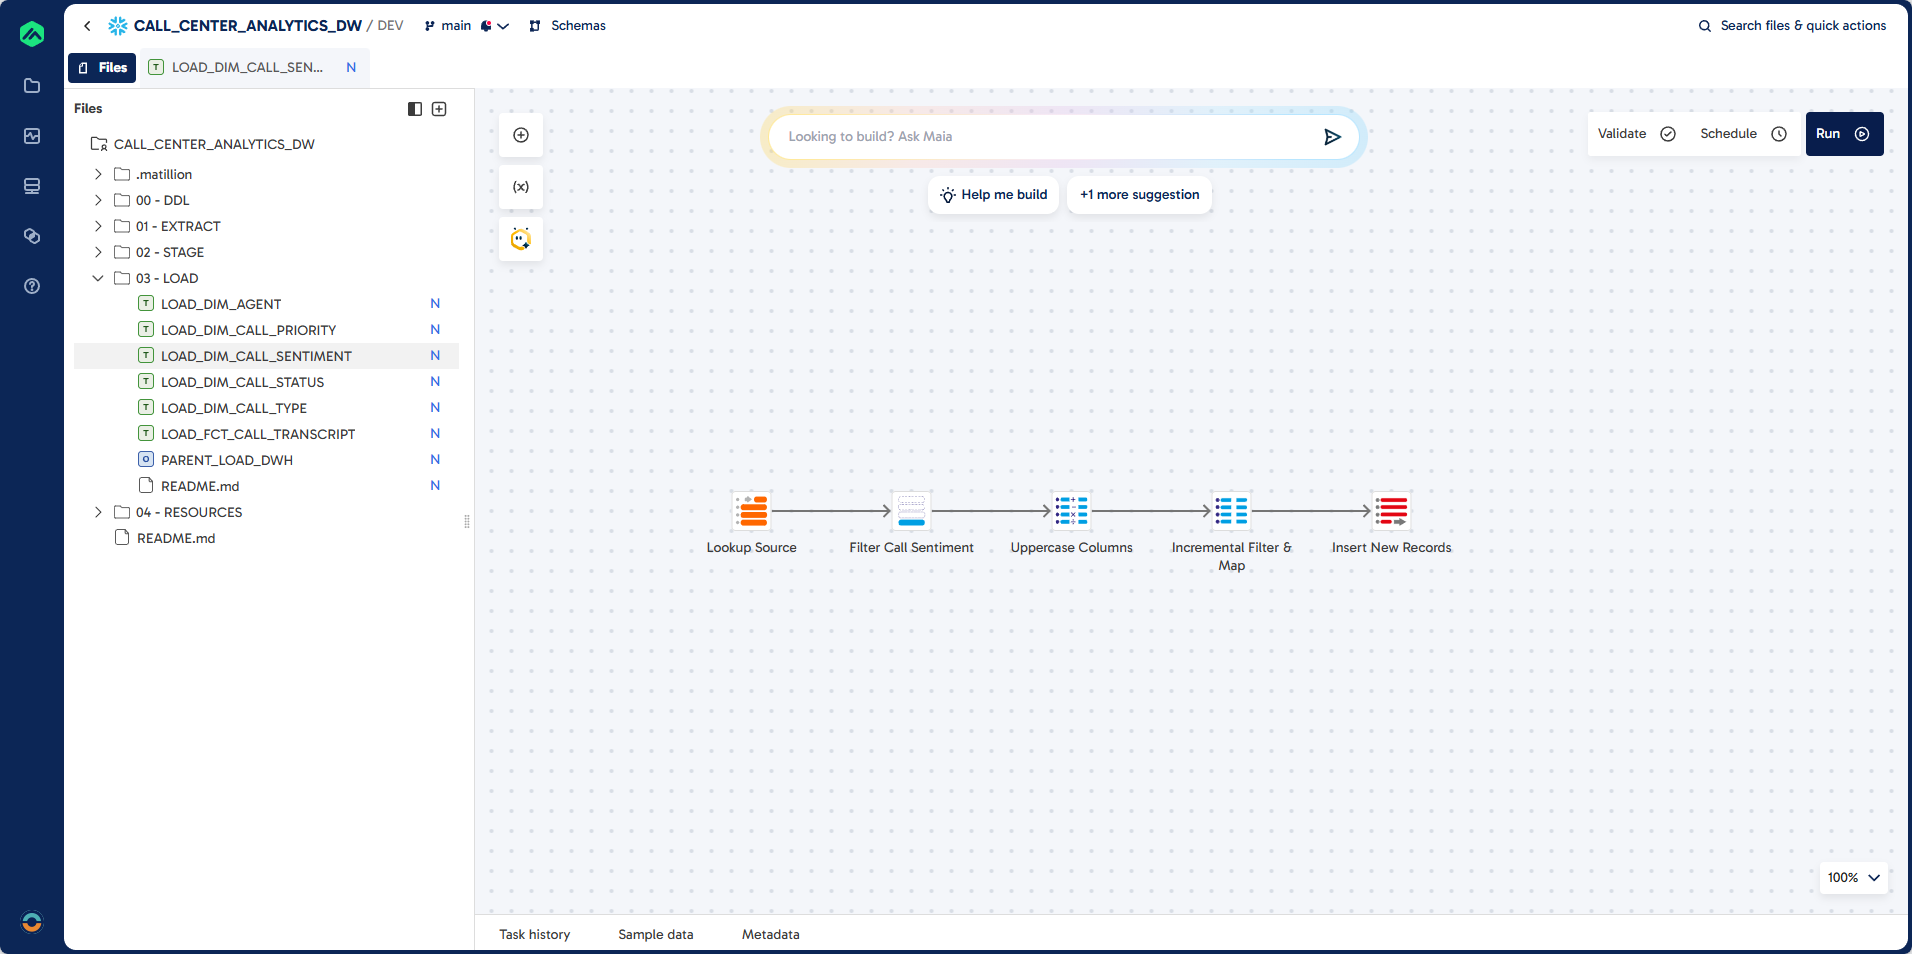
Prompt
Task: Create Dimension Load for DIM_CALL_SENTIMENT

Job Name: LOAD_DIM_CALL_SENTIMENT
Folder: 03 - LOAD

Source: EXTRACT.LOOKUP
Filter: LOOKUP_FILTER = "CALL_SENTIMENT"
Target: DWH.DIM_CALL_SENTIMENT (existing table)
Unique Identifier: CALL_SENTIMENT_CODE
Load Type: Incremental Load

Guidelines:
Component: Calculator
Ensure all columns are upper case

Component: SQL
Filter for records that do not exist in destination

Component: Table Ouput
Insert records into destination
Step 4: Create LOAD_DIM_CALL_STATUS
This step walks you through building a pipeline to load call status dimension data into DIM_CALL_STATUS. You will filter for call status lookups, ensure all columns are upper case, and exclude existing records for incremental loading.
Pipeline

Prompt
Task: Create Dimension Load for DIM_CALL_STATUS

Job Name: LOAD_DIM_CALL_STATUS
Folder: 03 - LOAD

Source: EXTRACT.LOOKUP
Filter: LOOKUP_FILTER = "CALL_STATUS"
Target: DWH.DIM_CALL_STATUS (existing table)
Unique Identifier: CALL_STATUS_CODE
Load Type: Incremental Load
Component: Table Input, SQL, Calculator, Table Ouput

Guidelines:
Ensure all columns are upper case
Filter Existing Records
Step 5: Create LOAD_DIM_CALL_TYPE
In this section, you will build a pipeline to load call type dimension data into DIM_CALL_TYPE. The process filters for call type lookups, transforms columns to upper case, and loads only new records.
Pipeline

Prompt
Task: Create Dimension Load for DIM_CALL_TYPE

Job Name: LOAD_DIM_CALL_TYPE
Folder: 03 - LOAD

Source: EXTRACT.LOOKUP
Filter: LOOKUP_FILTER = "CALL_TYPE"
Target: DWH.DIM_CALL_TYPE (existing table)
Unique Identifier: CALL_TYPE_CODE
Load Type: Incremental Load

Guidelines:
Component: Calculator
Ensure all columns are upper case

Component: SQL
Filter for records that do not exist in destination

Component: Table Ouput
Insert records into destination
Step 6: Create LOAD_FCT_CALL_TRANSCRIPT
This step covers building a pipeline to load fact data into FCT_CALL_TRANSCRIPT. You will join the analyzed transcripts with all dimension tables using lookups, handle incremental loads, and validate records before insertion.
Pipeline
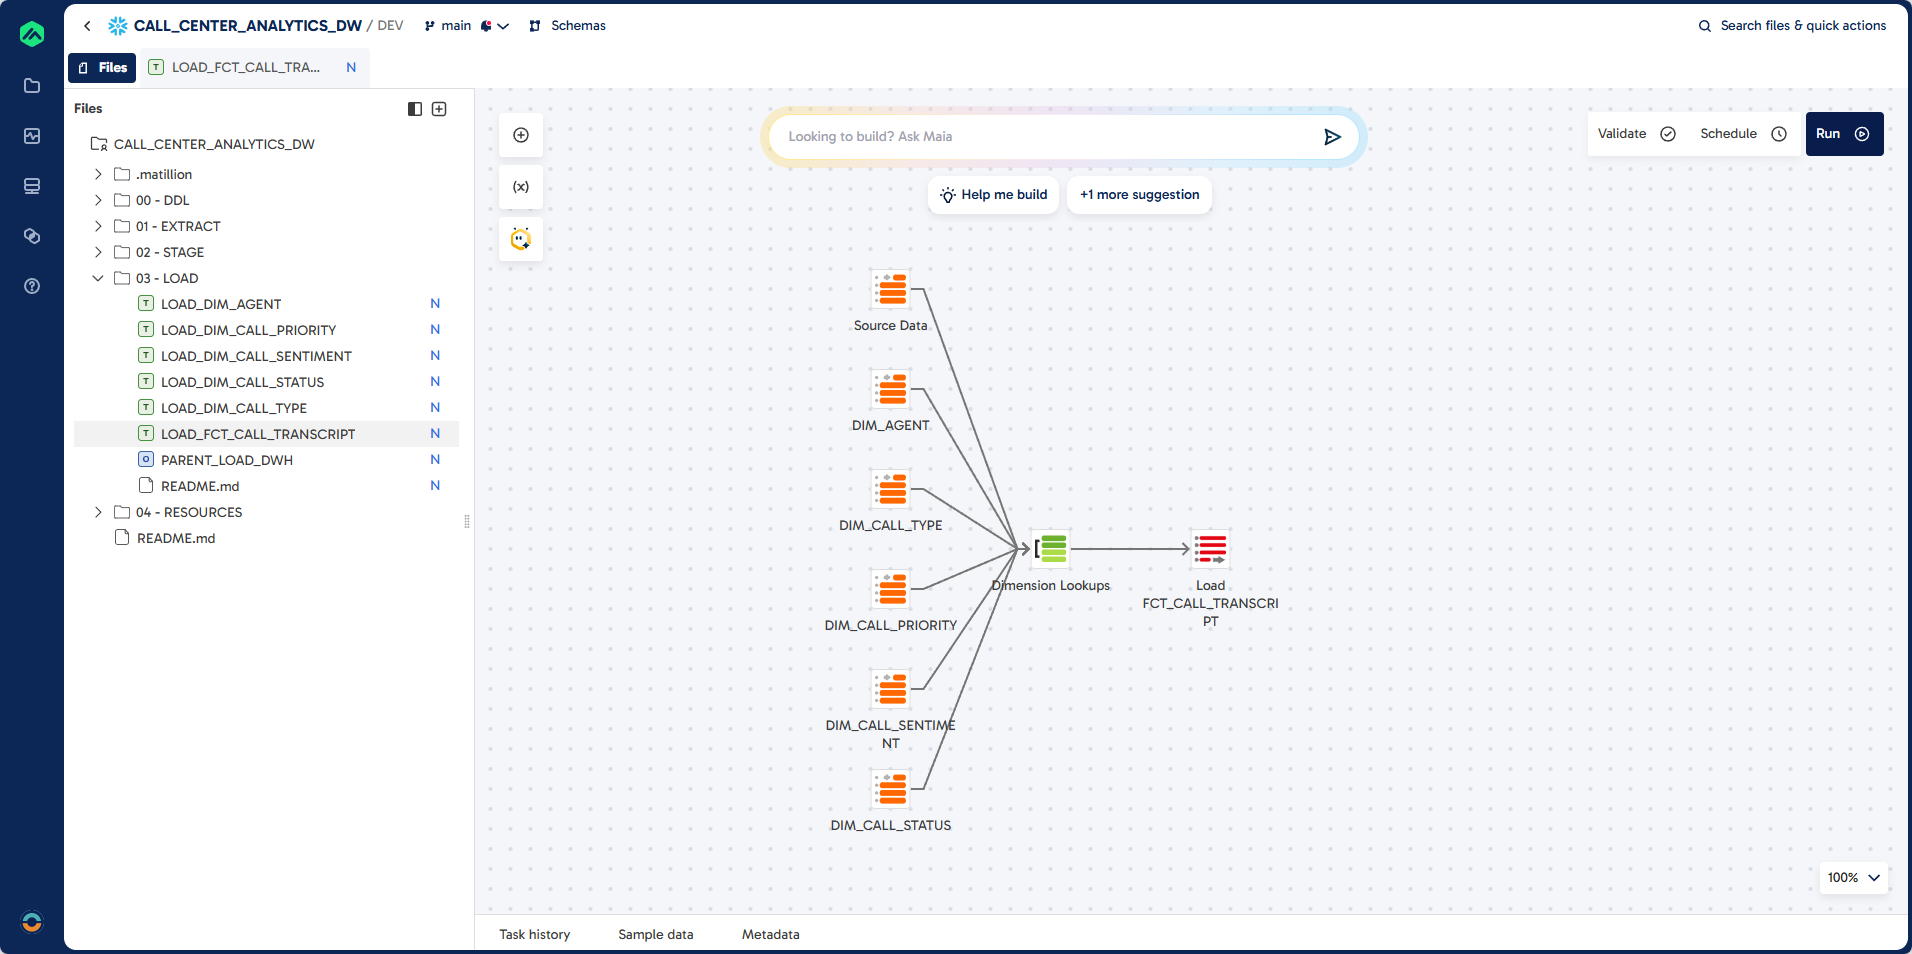
Prompt
Task: Create Load Process for FCT_CALL_TRANSCRIPT
Job Name: LOAD_FCT_CALL_TRANSCRIPT
Job Type: Transformation
Folder: 03 - LOAD

Source: STAGE.AUDIO_TRANSCRIPT_ANALYSIS
Target: DWH.FCT_CALL_TRANSCRIPT (existing table)

Unique Identifier: CALL_TRANSCRIPT_ID (unique identifier)
Load Type: Incremental Load
Validation Errors: If there are validation errors let me check manually

Dimension Lookup:
DWH.DIM_AGENT
DWH.DIM_CALL_PRIORITY
DWH.DIM_CALL_SENTIMENT
DWH.DIM_CALL_STATUS
DWH.DIM_CALL_TYPE

Guidelines:
Create lookups for the dimensions that include the natural keys and surrogate keys.
Join these to the results from the audio transcript table.
Step 7: Create PARENT_LOAD_DWH
Finally, you will create a parent orchestration job to automate the full data warehouse load process. This job truncates all dimension and fact tables, then runs all dimension and fact load jobs in sequence.
Pipeline
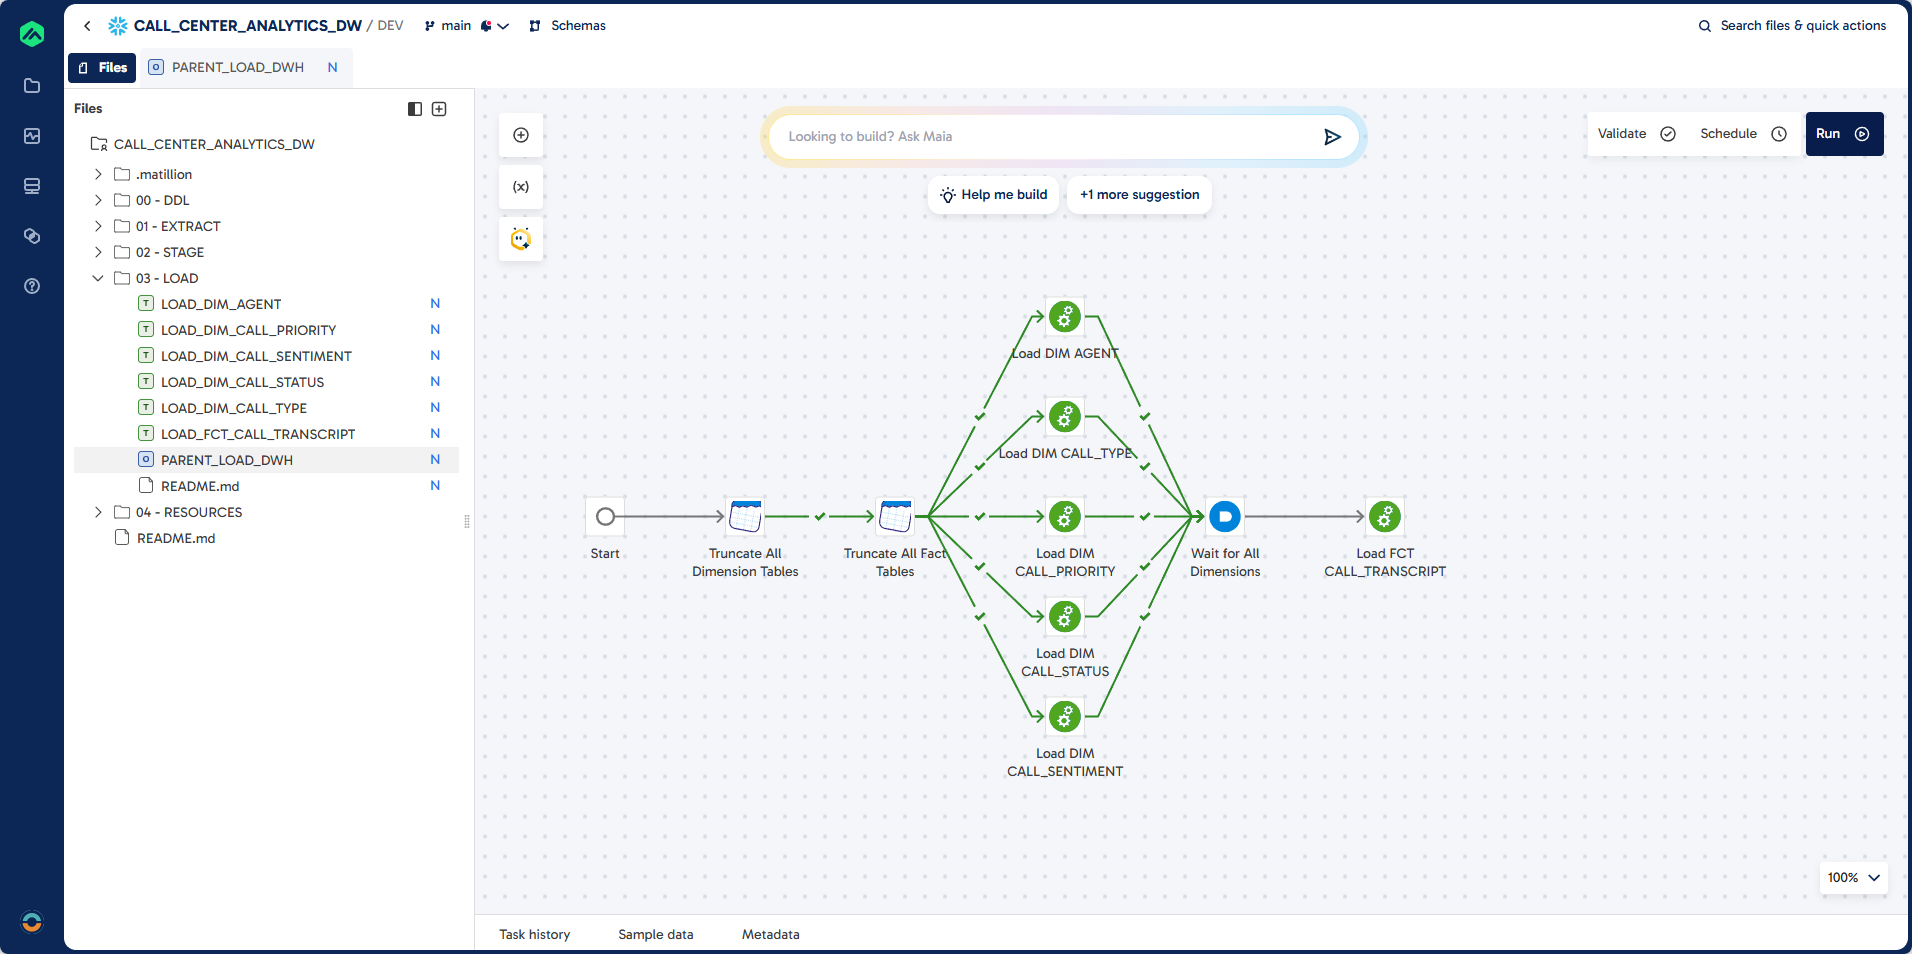
Prompt
Task: Create a Parent Orchestration Job.
Job Name: PARENT_LOAD_DWH
Job Type: Orchastration
Folder: 03 - LOAD

Guidelines:
Use DWH Schema
First truncate all the dimensions (tables prefixed with DIM_)
Then truncate all the fact tables (tables prefixed with FCT_)

Then run all the load dimension jobs (Jobs starting with LOAD_DIM_)
Then run all the load fact jobs (Jobs starting with LOAD_FCT_)

The load jobs are in the folder: 03 - Load
What You Learned
- Set up a Snowflake environment (database, warehouses, schemas, stages) for AI-driven analytics.
- Connected Matillion Maia to Snowflake and configured project defaults for smooth development.
- Built Extract and Stage pipelines to load audio files, transcribe them with Cortex AI, and enrich transcripts with key attributes (agent, summary, sentiment, type, status, priority, score).
- Modeled a star schema and implemented incremental loads for dimension and fact tables.
- Orchestrated a full warehouse refresh via a parent job.
Further Exploration
- Build a semantic view in Snowflake that joins facts and dimensions with friendly names and formats (dates, percentages), then grant access to BI tools for self-service analytics.
- Create an agent for analysts: use Snowflake Cortex Analyst or your preferred agent framework to answer natural language questions over the semantic view (e.g., "show weekly complaint rate by agent").
- Add vector search: index call summaries and transcripts with Cortex Search for better retrieval-augmented Q&A.
- Track data quality: add validation checks and exception tables to monitor transcript completeness and join coverage.
- Automate schedules: run incremental loads on a schedule and alert on failures via your preferred channel.
Dive deeper with these docs and ideas:
🎓 If you joined this lab as part of a AI Lab training session, you'll receive a certified badge of attendance.
Thank you for spending time with us!
Visit datalab at www.datalab.co.za to learn more about our AI training and analytics solutions.
Follow us on LinkedIn for new labs and updates.